
A Brief History of Free WordPress Hosting
In the past there were arguably only three ways to get free WordPress hosting:
- Around 2010 a certain host handed out free hosting for life promotional accounts at WordCamps. The only caveat was traffic should stay below 25,000 page views per month or the account would slide into the next tier and convert to a paying account. Let's not get hung up the last part because it was a generous offer with a reasonable path to more paying customers and they still honor it to this day. IYKYK.
- You had a friend with their own server. A very relatable situation right? *side-eyes friend with site still on your box*
- A host with a promotional free tier. In the past this meant a VPS with a 1⁄8–1⁄16 slice of a full core and 512mb–1gb of memory. If you tuned the stack you could get WordPress up and running but then a new problem would present itself: any meaningful amount of traffic would dry up the resources and the server would tumble off the net.
So what changed in the free hosting space?
In 2021 Oracle announced a Oracle new offering in their always free tier: a VPS with 4 cores and 24gb of RAM. The catch? It runs on an Ampere ARM-based processor rather than the ubiquitous x86 architecture. To take advantage you'd need software which can compile on ARM.
First things first
Let's be honest, when most people think of hosting they expect to log into a control panel and set up the stack, users, domains, databases… you know do everything. If your immediate reaction's to recoil at such a suggestion because you want nothing but the command-line and well-tuned stack placed between the operating system and your users this how-to isn't for you. It's possible you might learn a few things about spinning up an Oracle Cloud instance running Ubuntu and working with their Security List ingress rules your time might be better served helping people get up to speed in the comments. Alright levels set, let's move on.
After a little digging I found the following panels run on ARM:
Free Options:
Commercial Options:
- DirectAdmin (my favorite control panel the last 10 years. Please note: ARM is only supported at the Pro Pack level, which starts at $5/mo)
- Plesk Control Panel
After you choose a panel the next is to select which stack to run but, again, not all software will compile correctly on ARM so the choices shrink again. Here's what you're limited to:
Webservers:
- Apache
- NGINX
! Note: Unfortunately, at the time of writing OpenLiteSpeed (OLS) doesn't officially support ARM CPUs, otherwise it would be a welcomed addition to the list.
Databases:
- MySQL
- MariaDB
Sign up for an Oracle Cloud account 10 – 15 minutes
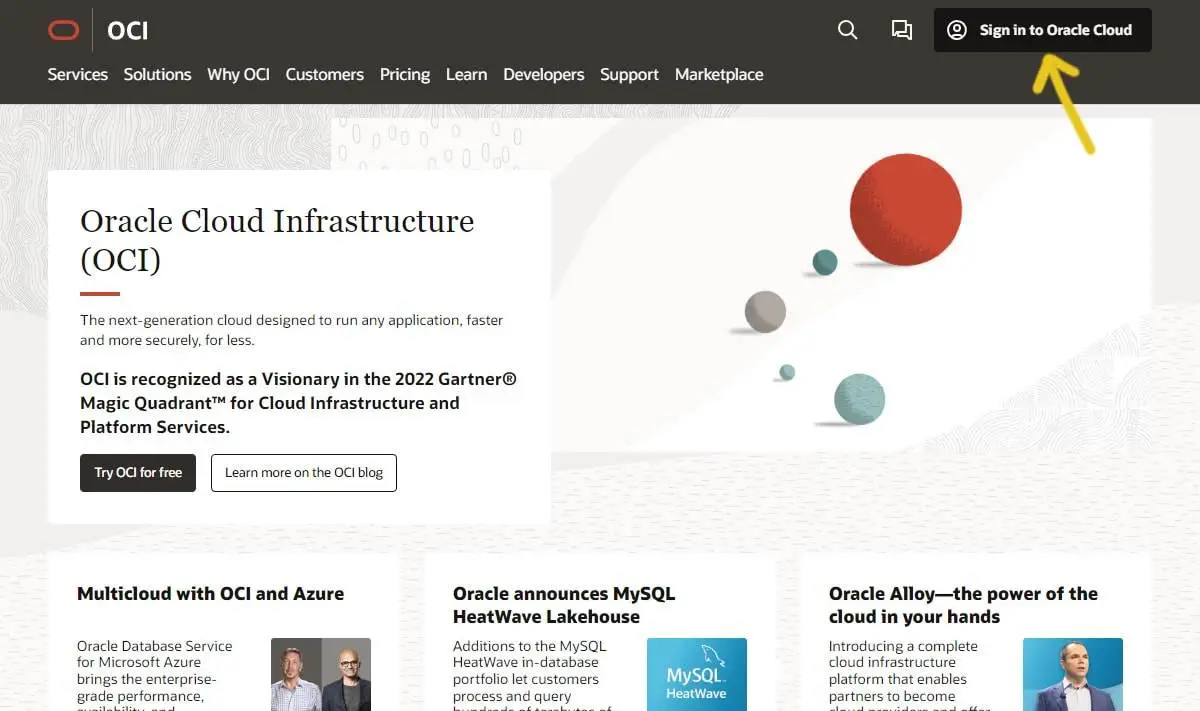 Step 1: go to Oracle.com/cloud and click the Sign in to Oracle Cloud button in the top-right.
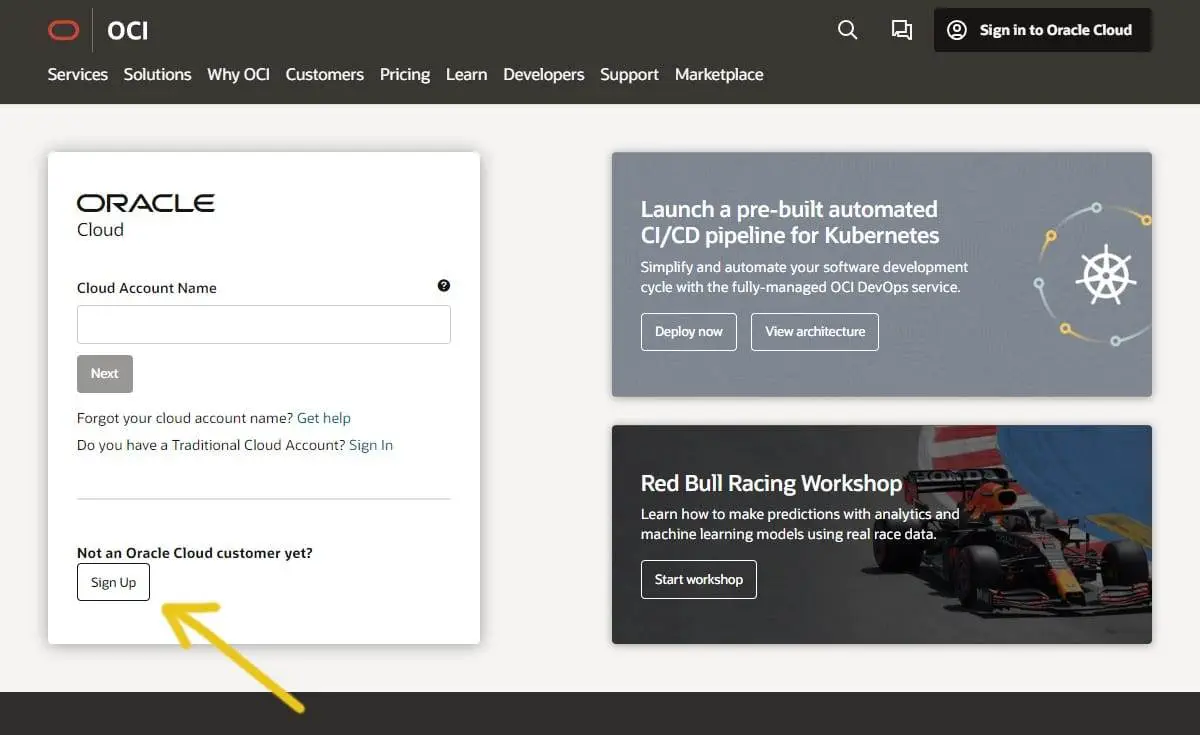 Step 2: click the Sign Up button to start the account creation process.
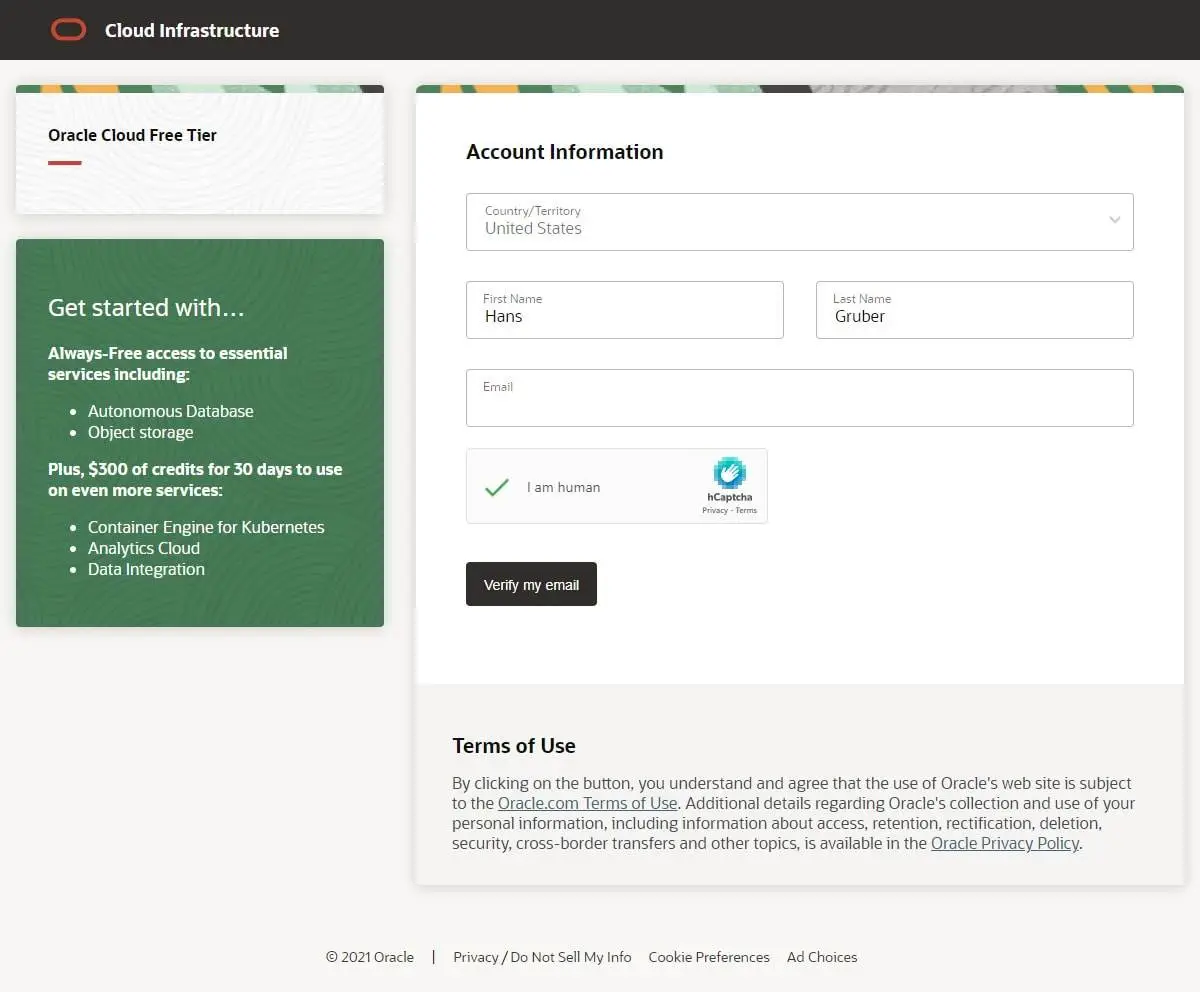 Step 3: fill out the first part of the Account Information form with your first name, last name, email address, click the checkbox in the CAPTCHA field, then click the Verify my email button to continue.
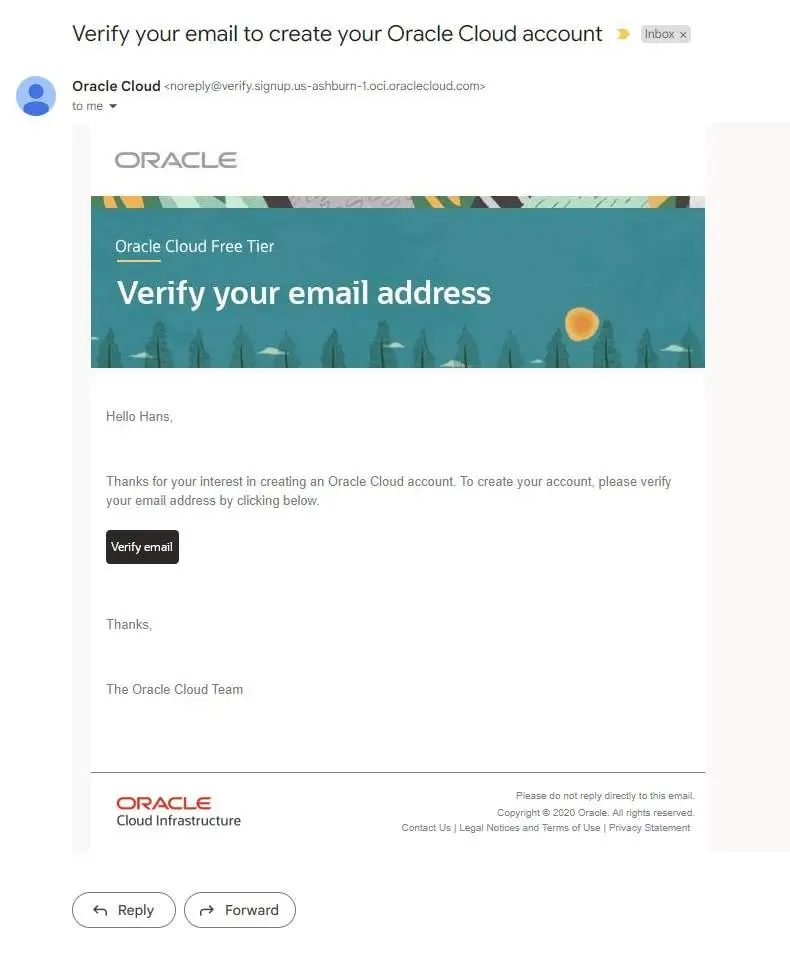 Step 4: check your email (and spam folder) for Oracle Cloud's verification email then click the Verify email button to return to the Oracle Cloud site and continue the account creation process.
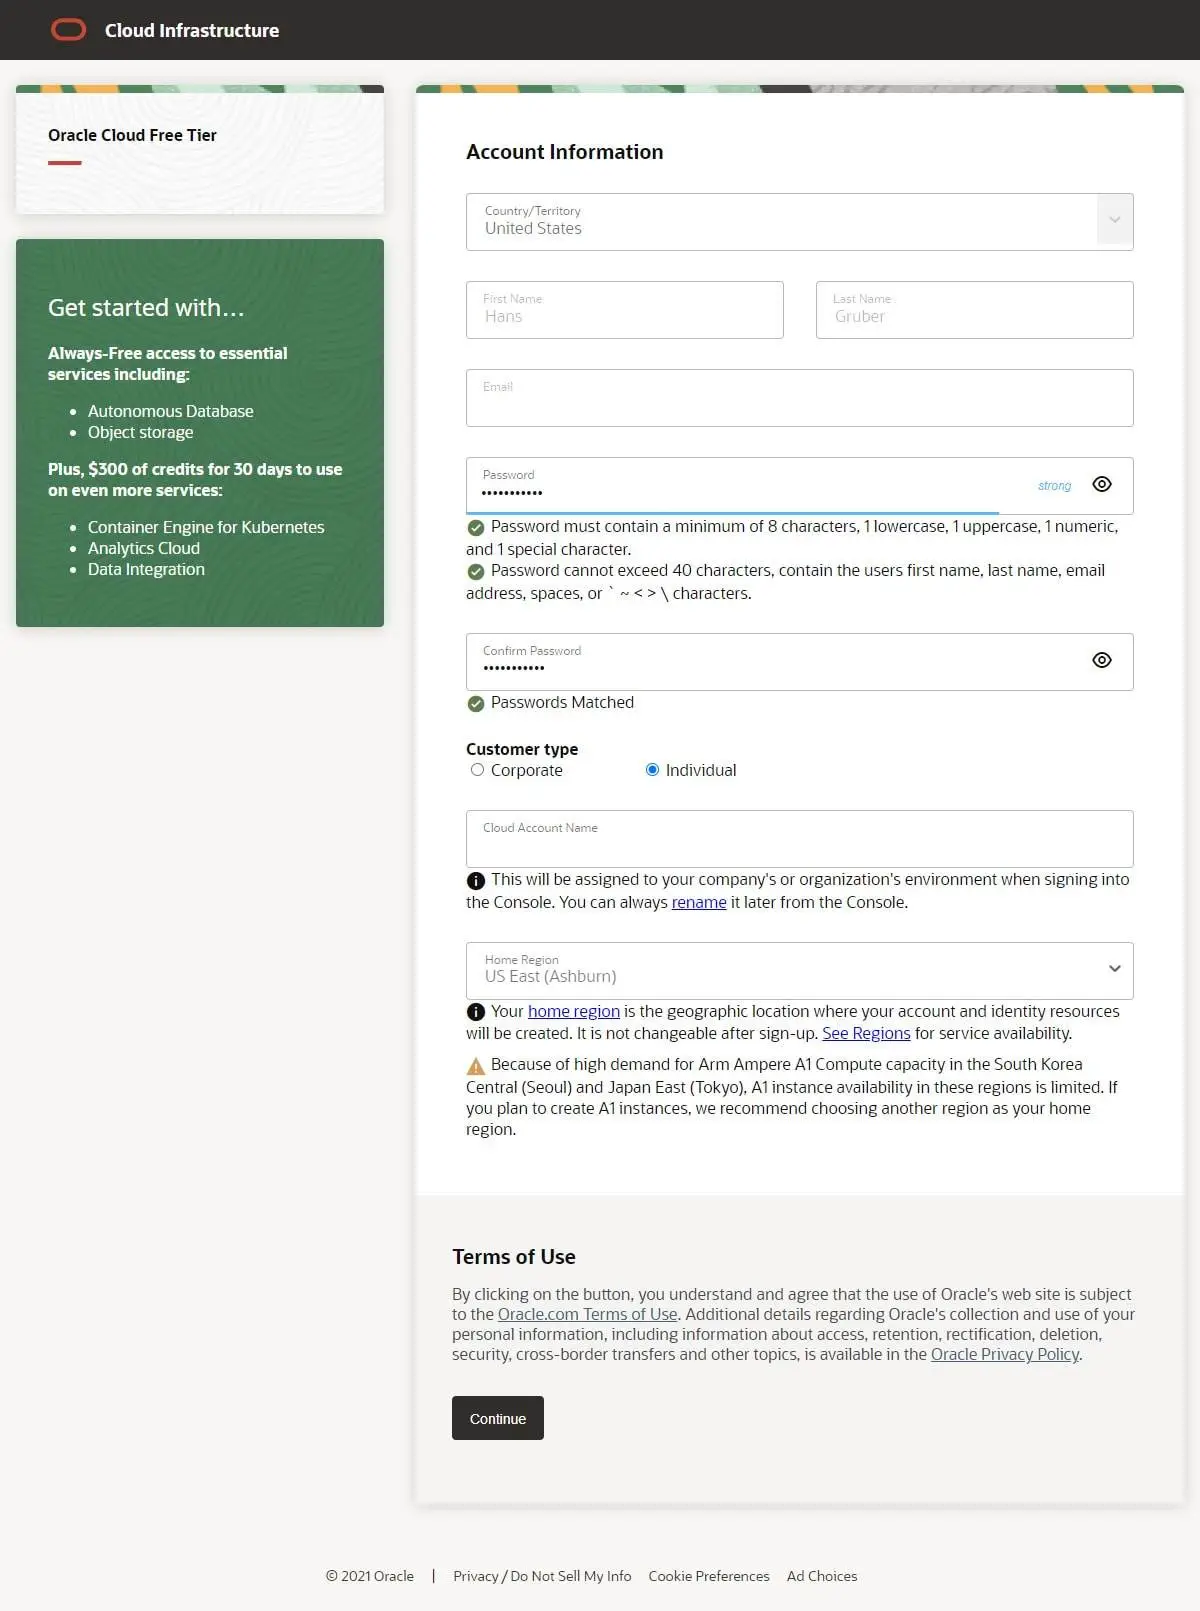 Step 5: after the Account Information form reloads add a password, select a customer type, decide on a Cloud Account Name, and set your Home Region then click the Continue button.
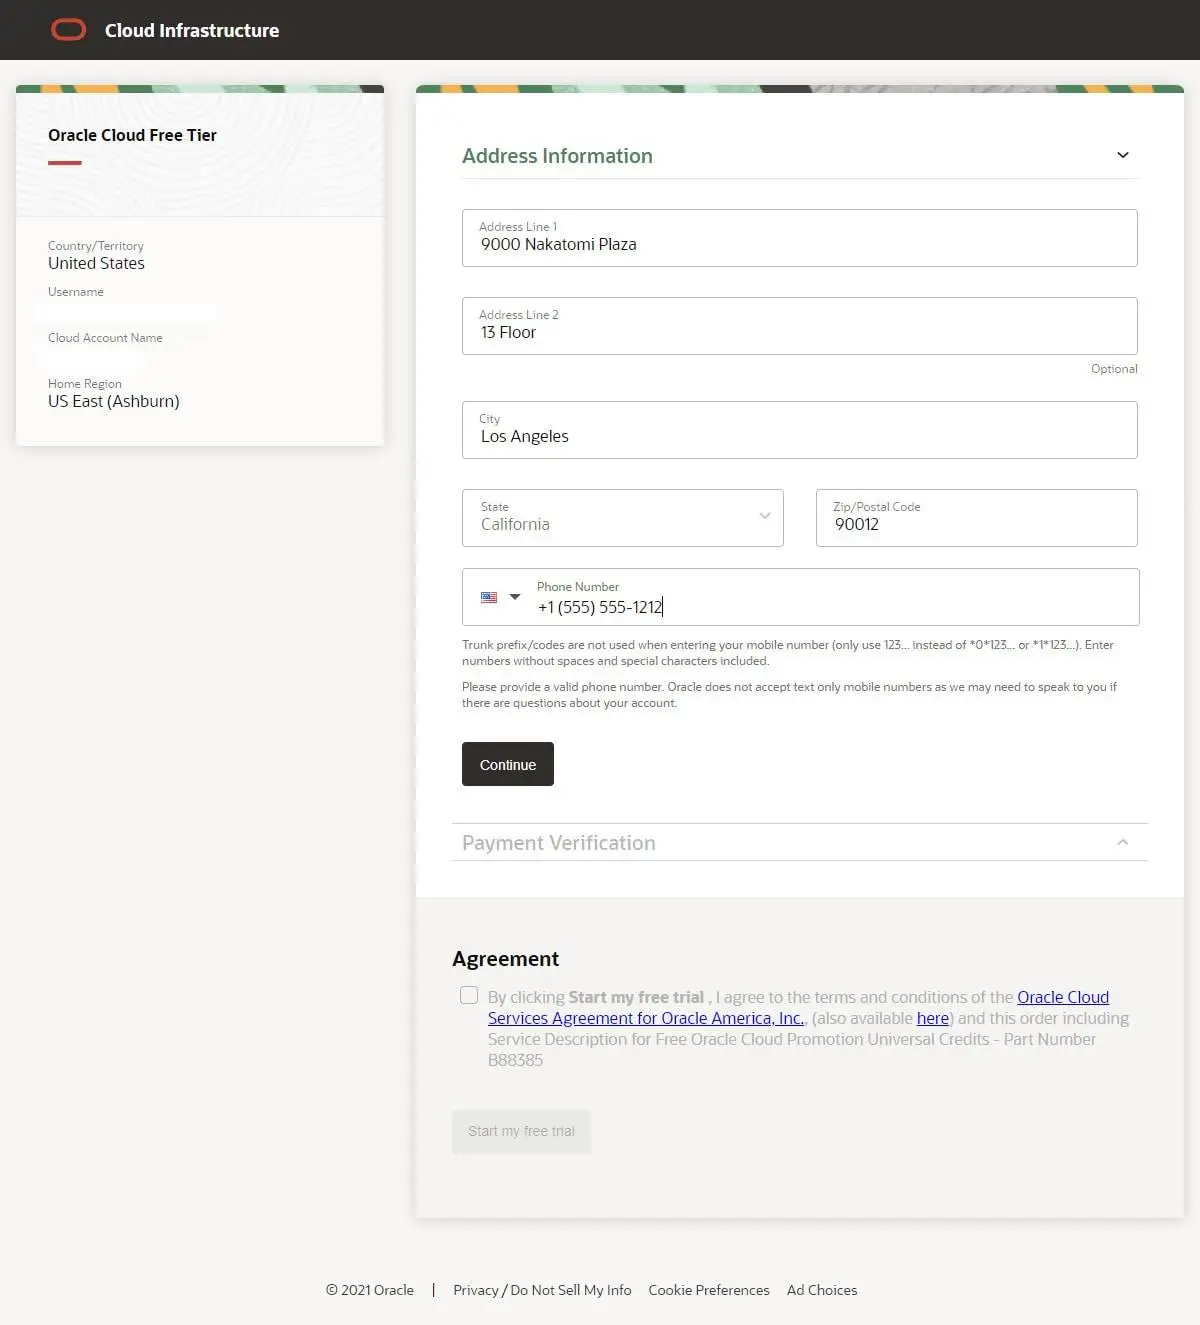 Step 6: fill out the Address Verification form with your – you guessed it – address and phone number then click the Continue button.
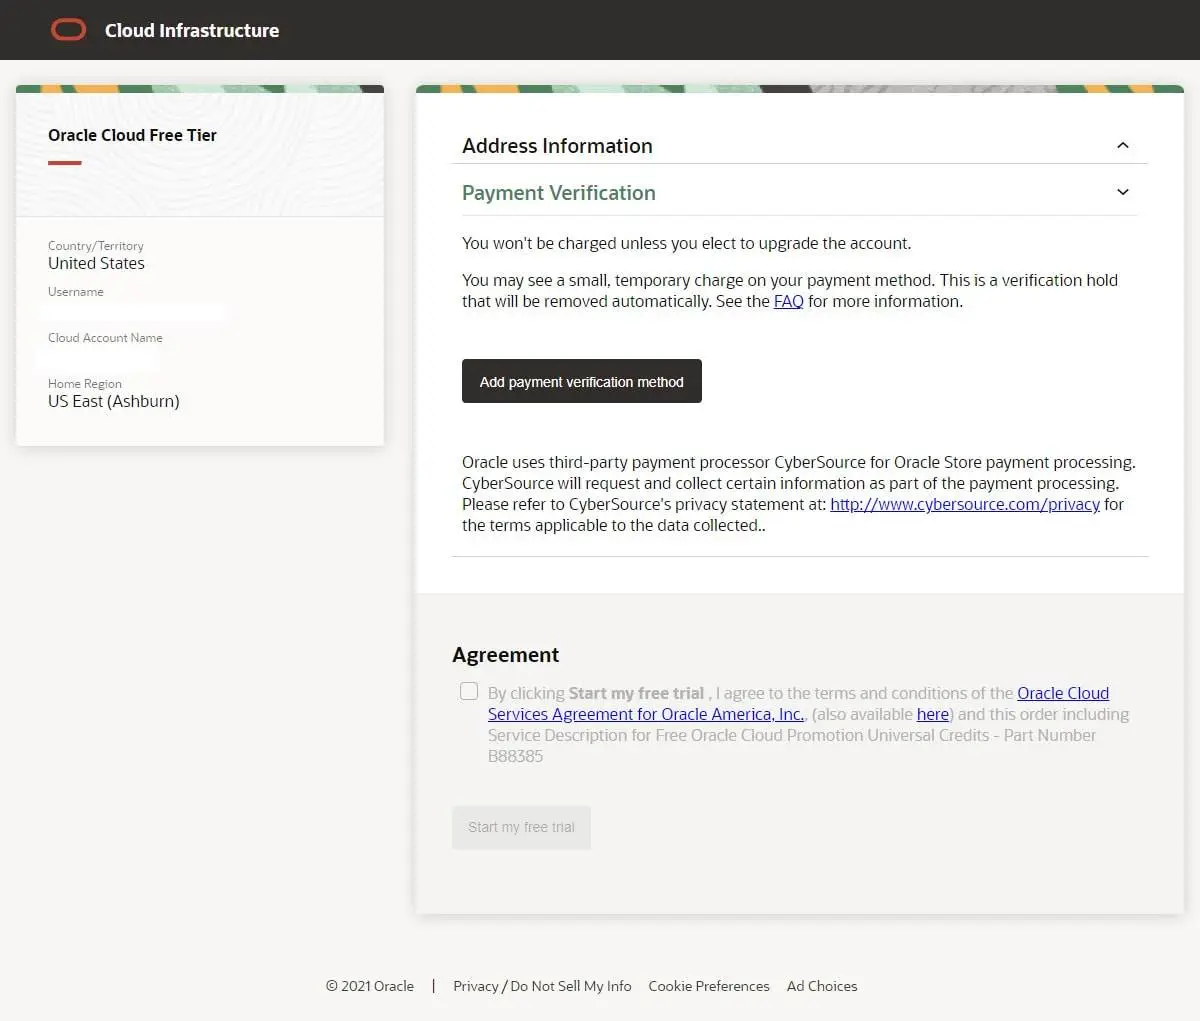 Step 7: on the Payment Verification page click the Add payment verification methodbutton.
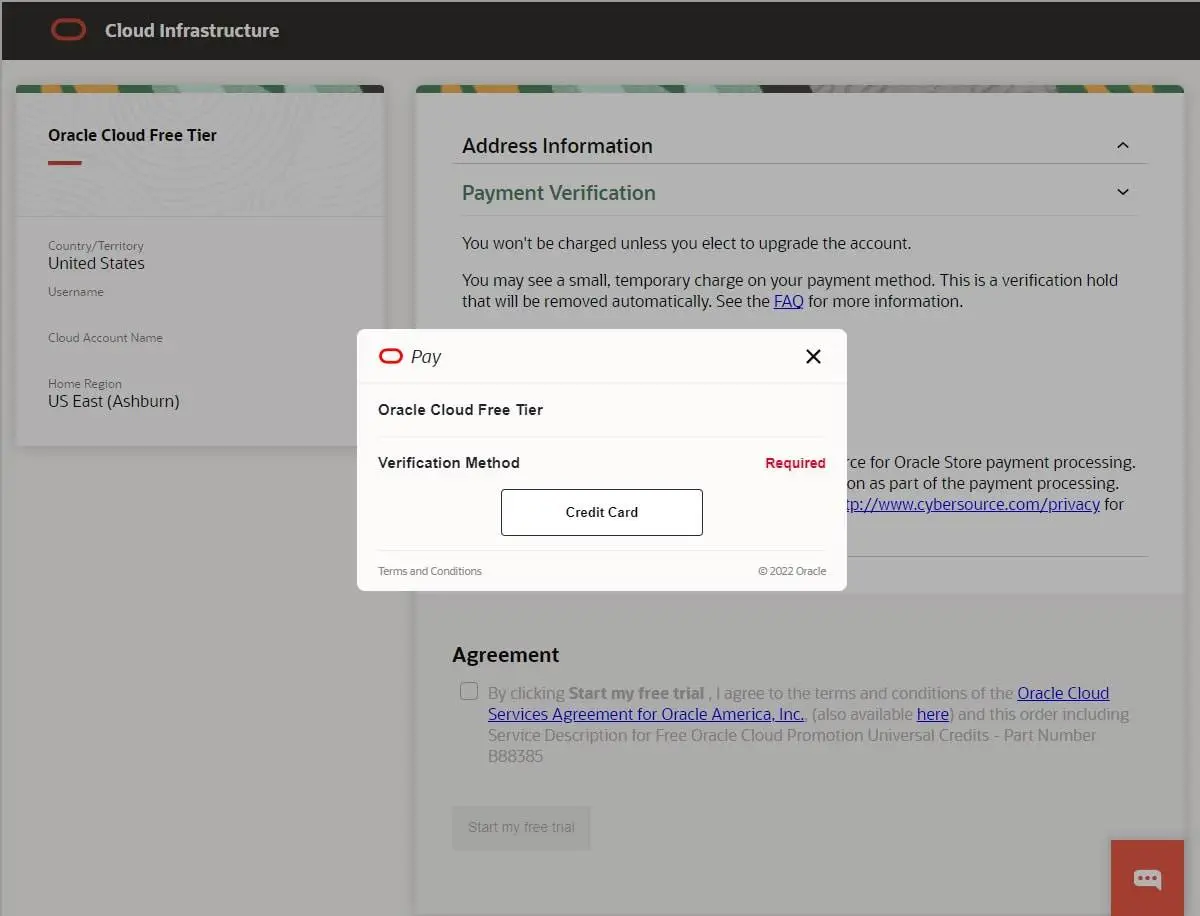 Step 8: click the Credit Card button.
Step 9: (not pictured) fill out the credit card form and wait for it to be accepted.
! Careful: Redditors have reported free tier instance(s) were terminated for adding a virtual credit card number (à la Privacy.com) instead of using a normal credit card issued by a bank. It's strongly recommended to skip using virtual or prepaid cards in favor of bank-issued credit cards for the payment method.
Step 10: (not pictured) click the checkbox below the Agreement heading to accept Oracle's Terms of Service then click the Start my free trial button to finalize setting up your new Oracle Cloud account.
Create an Oracle Cloud instance 5 – 10 minutes
If you successfully created an Oracle Cloud account you should see an email in your inbox (or spam folder) with login details. The link to your Oracle Cloud account will be personalized based on the Cloud Account Name set up in step five and look something like:
https://myservices-CloudAccountName.console.oraclecloud.com/mycloud/cloudportal/gettingStarted
Please log in to your new account and let's get started.
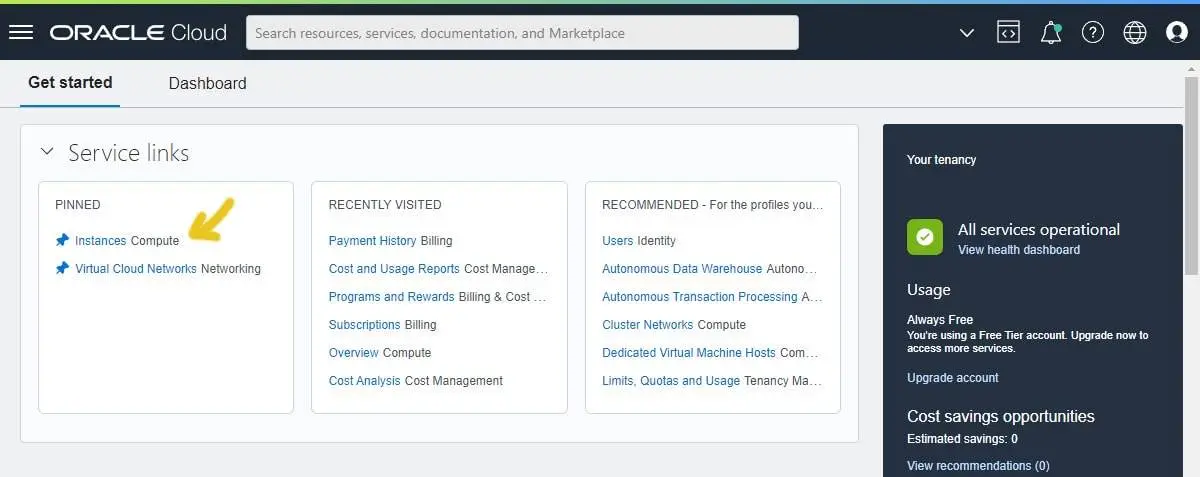 Step 1: sign in to your Oracle Cloud dashboard and click Instances Compute.
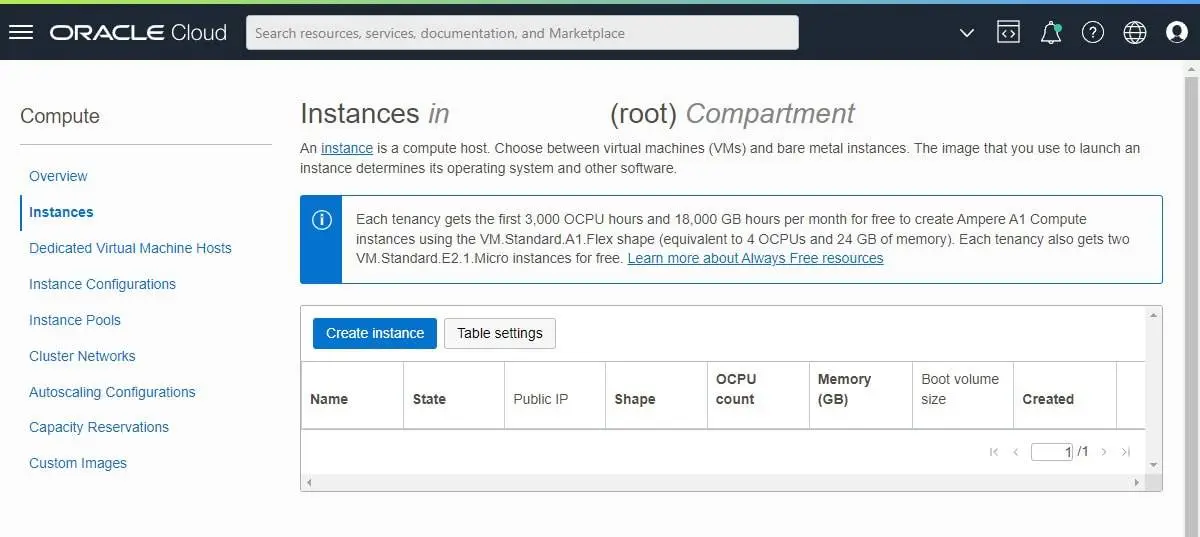 Step 2: on the Instances page click the Create Instance button.
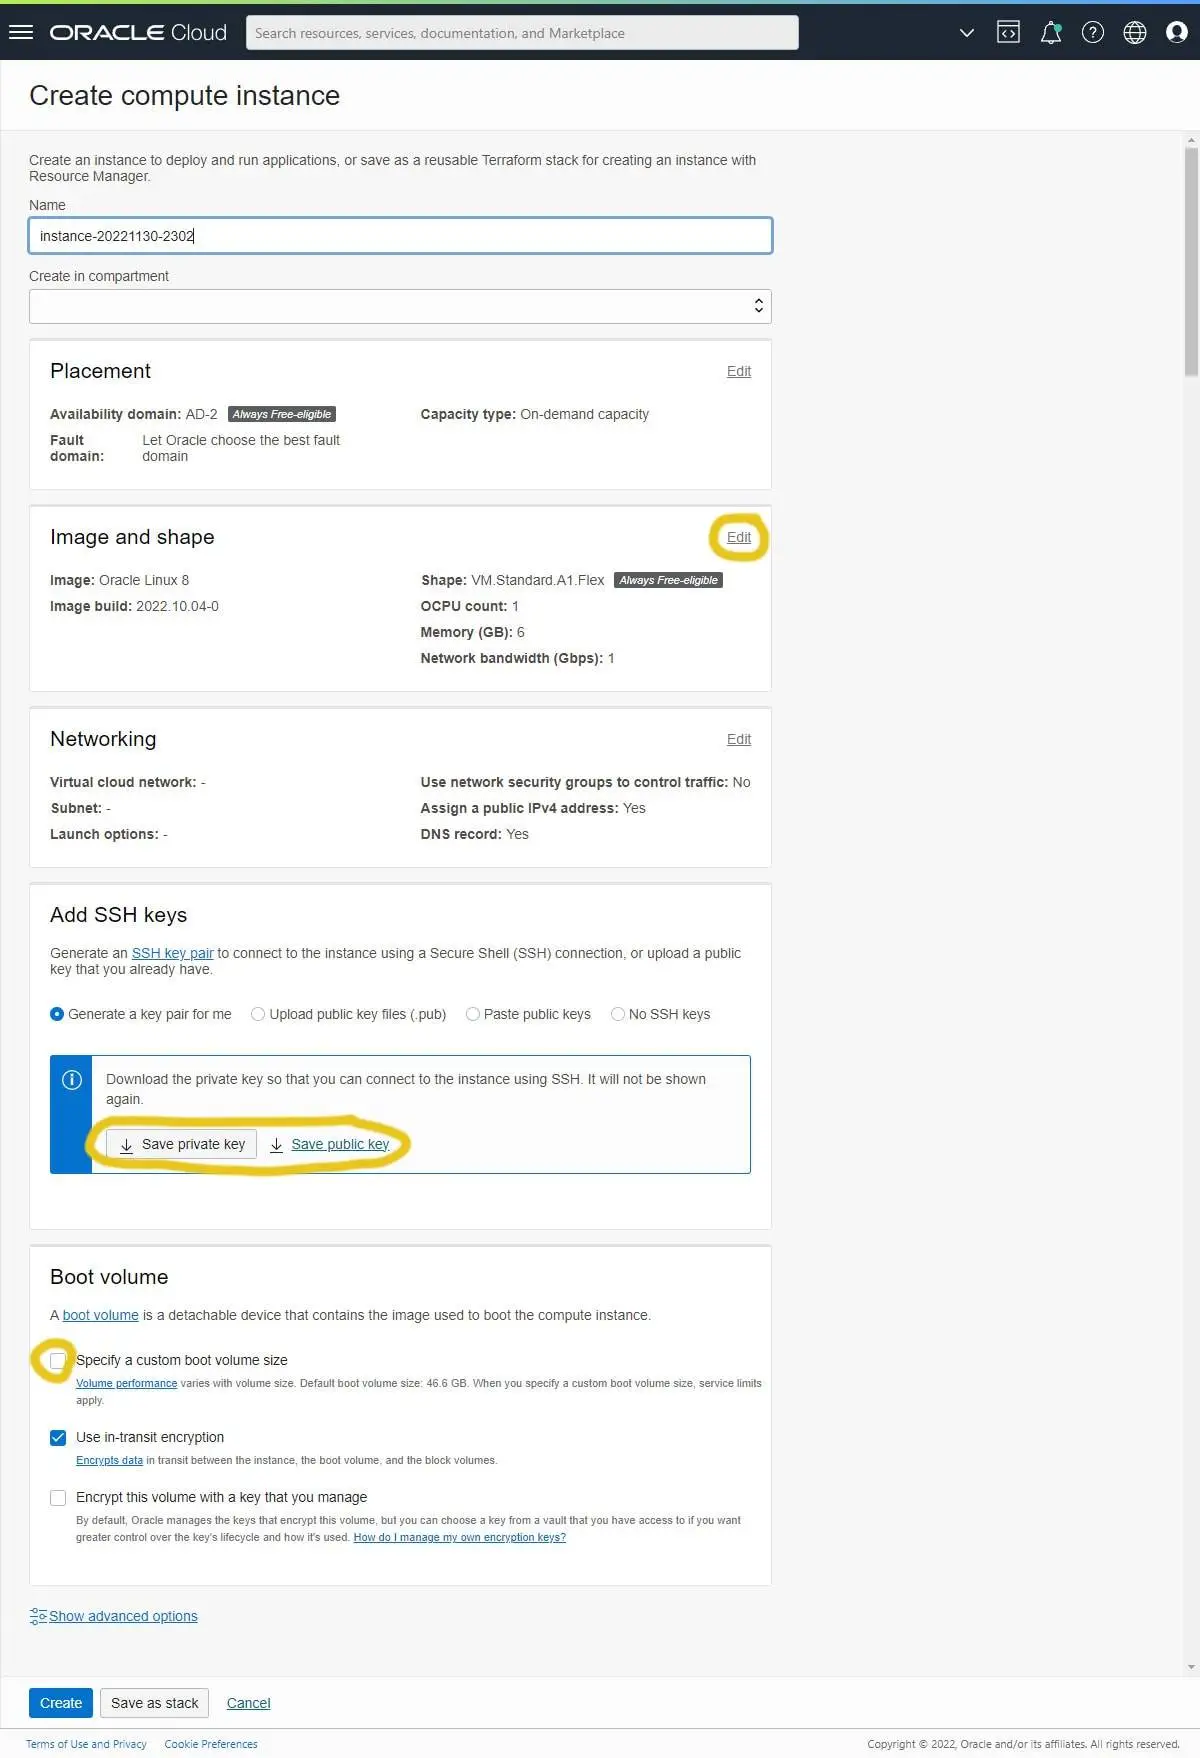 Step 3: the Create Compute Instance page will load and items circled in orange are sections we need to touch. Click the Edit link in the top-right corner of the Image and shape section to start.
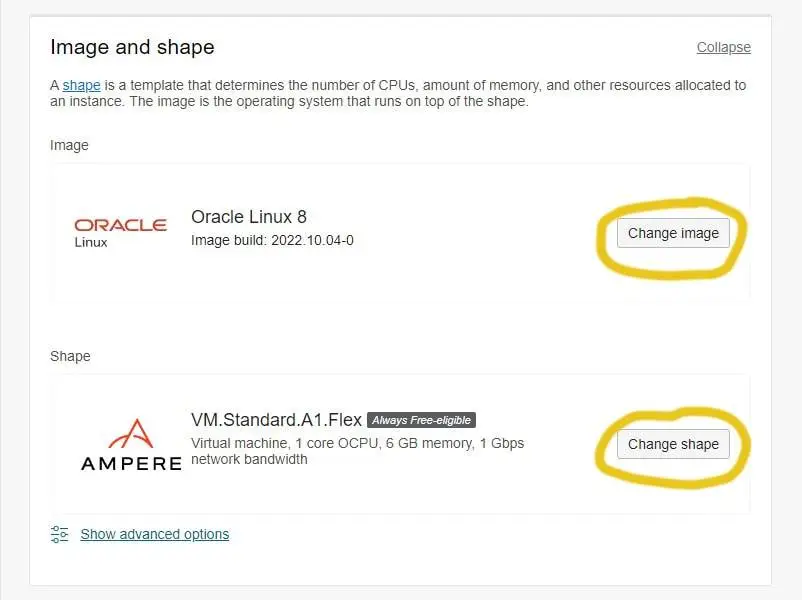 Step 4: on the Image and shape overlay it's easier to start with the shape so click the Change shape button.
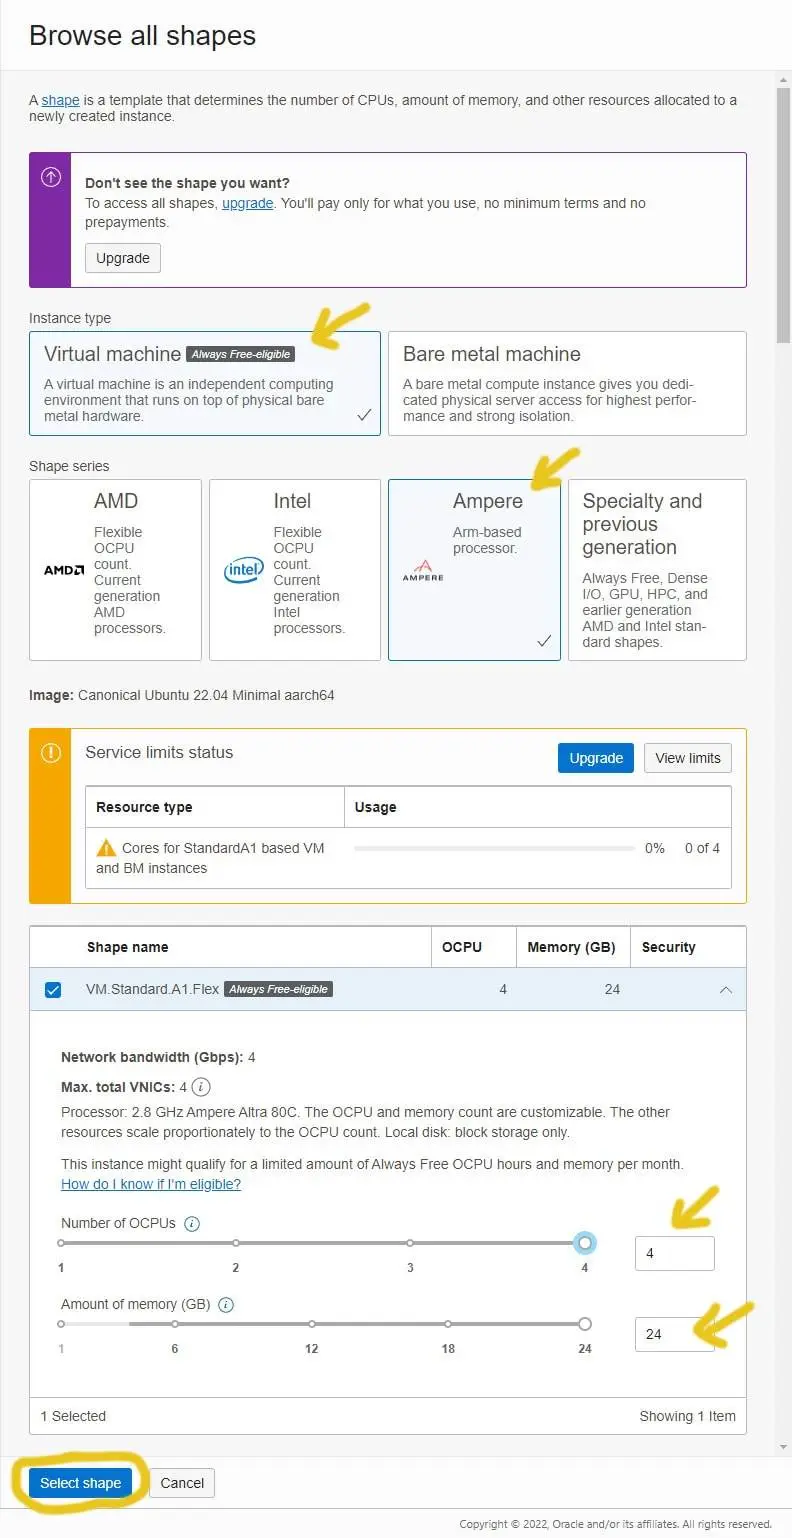 Step 5: the Browse all shapes overlay will show every instance type available on Oracle Cloud but for this article we're going to spin up a single instance which maximizes the resources available on Oracle's the Always Free tier: an Ampere ARM-based instance with 4 OCPU cores, 24gb of memory, and 200gb of boot storage. Please select Virtual machine, Ampere, set the OCPU to 4, memory to 24gb, and then click the Select shape button to move on to the next step.
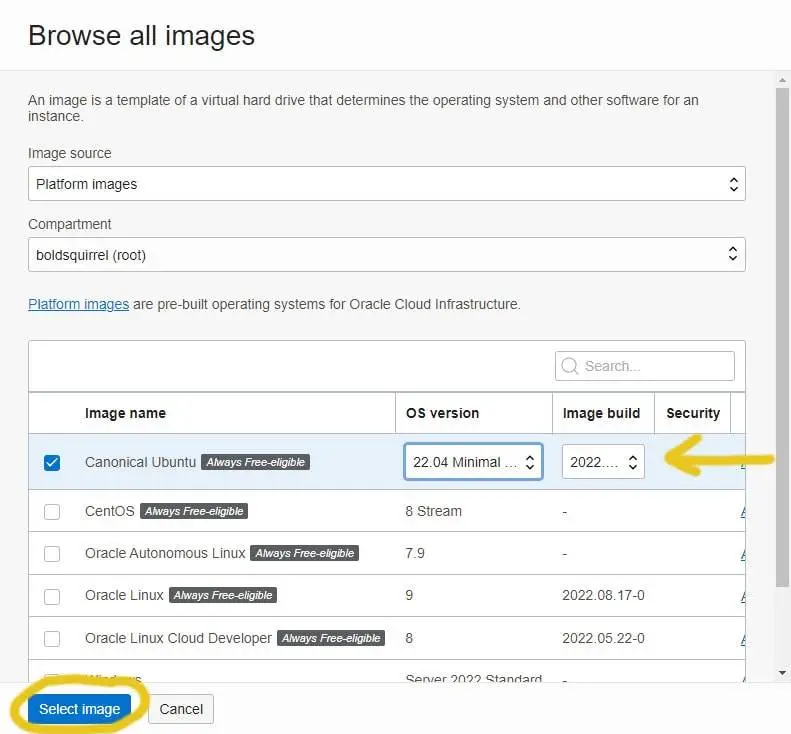 Step 6: select the following image:
Canonical Ubuntu22.04 Minimal aarch642022.11.05-0 2023.01.30-0 (Updated)
then click the Select image button.
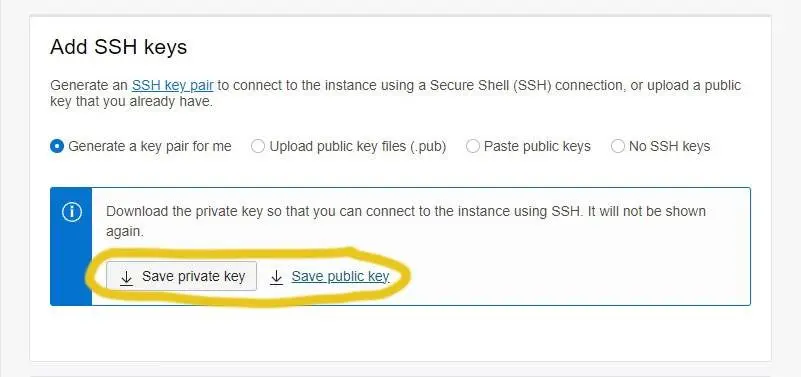 Step 7: you should be back on the Create compute instance screen with the Image and shape section updated to show the changes made during steps 4-6. Now click the Save private key button and the Save public key link. We'll need the private key soon to connect to our new instance.
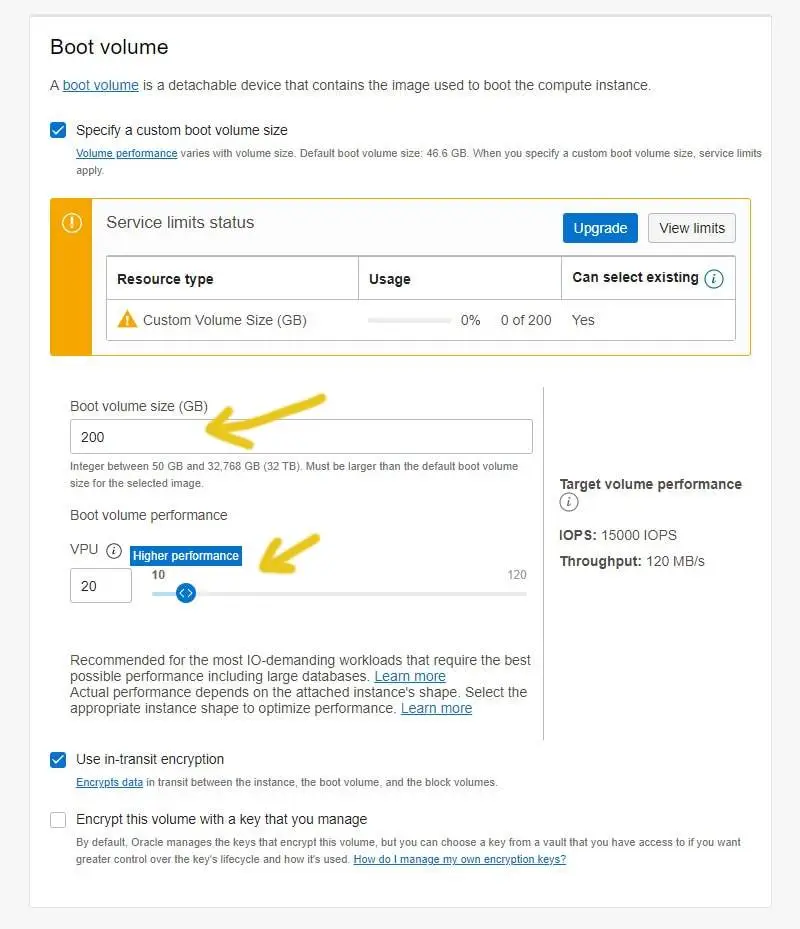 Step 8: still on the Create compute instance screen, scroll down to the Boot volume section, set the Boot volume size to 200gb, then pause at the Boot volume performance toggle to consider if your instance needs a faster setting than the default 10 VPU.
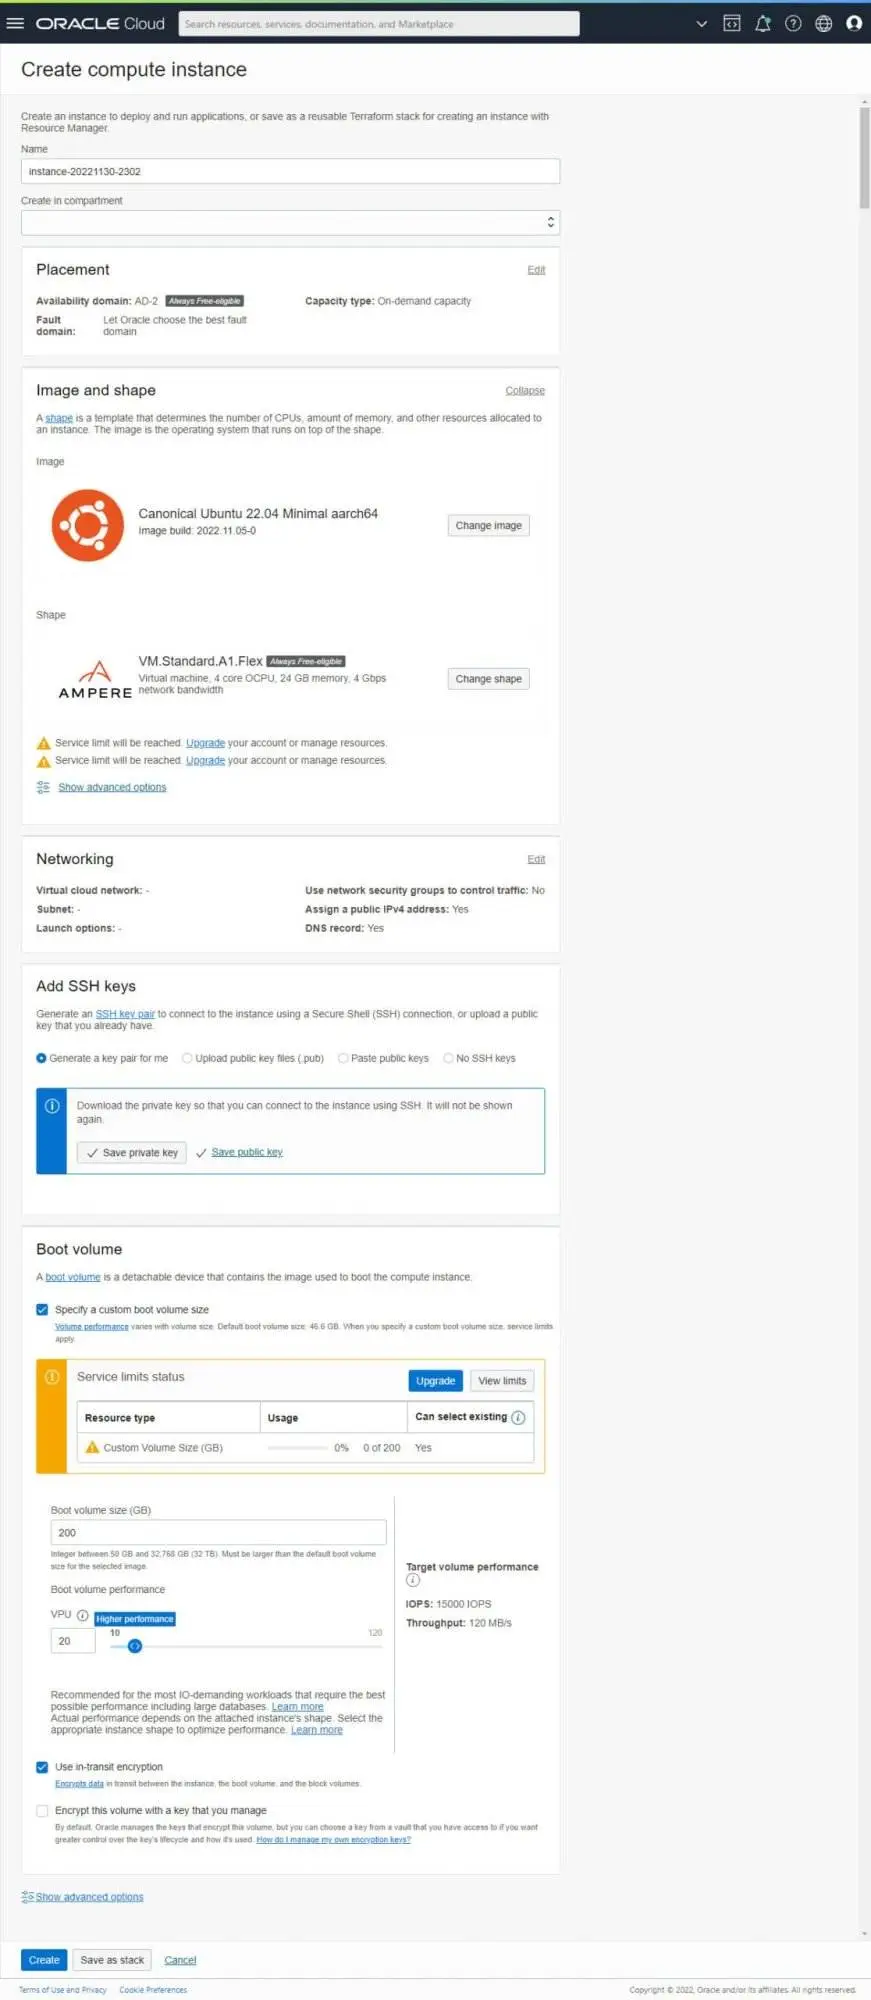 Step 9: if everything on the Create compute instance screen looks right click the Create button.
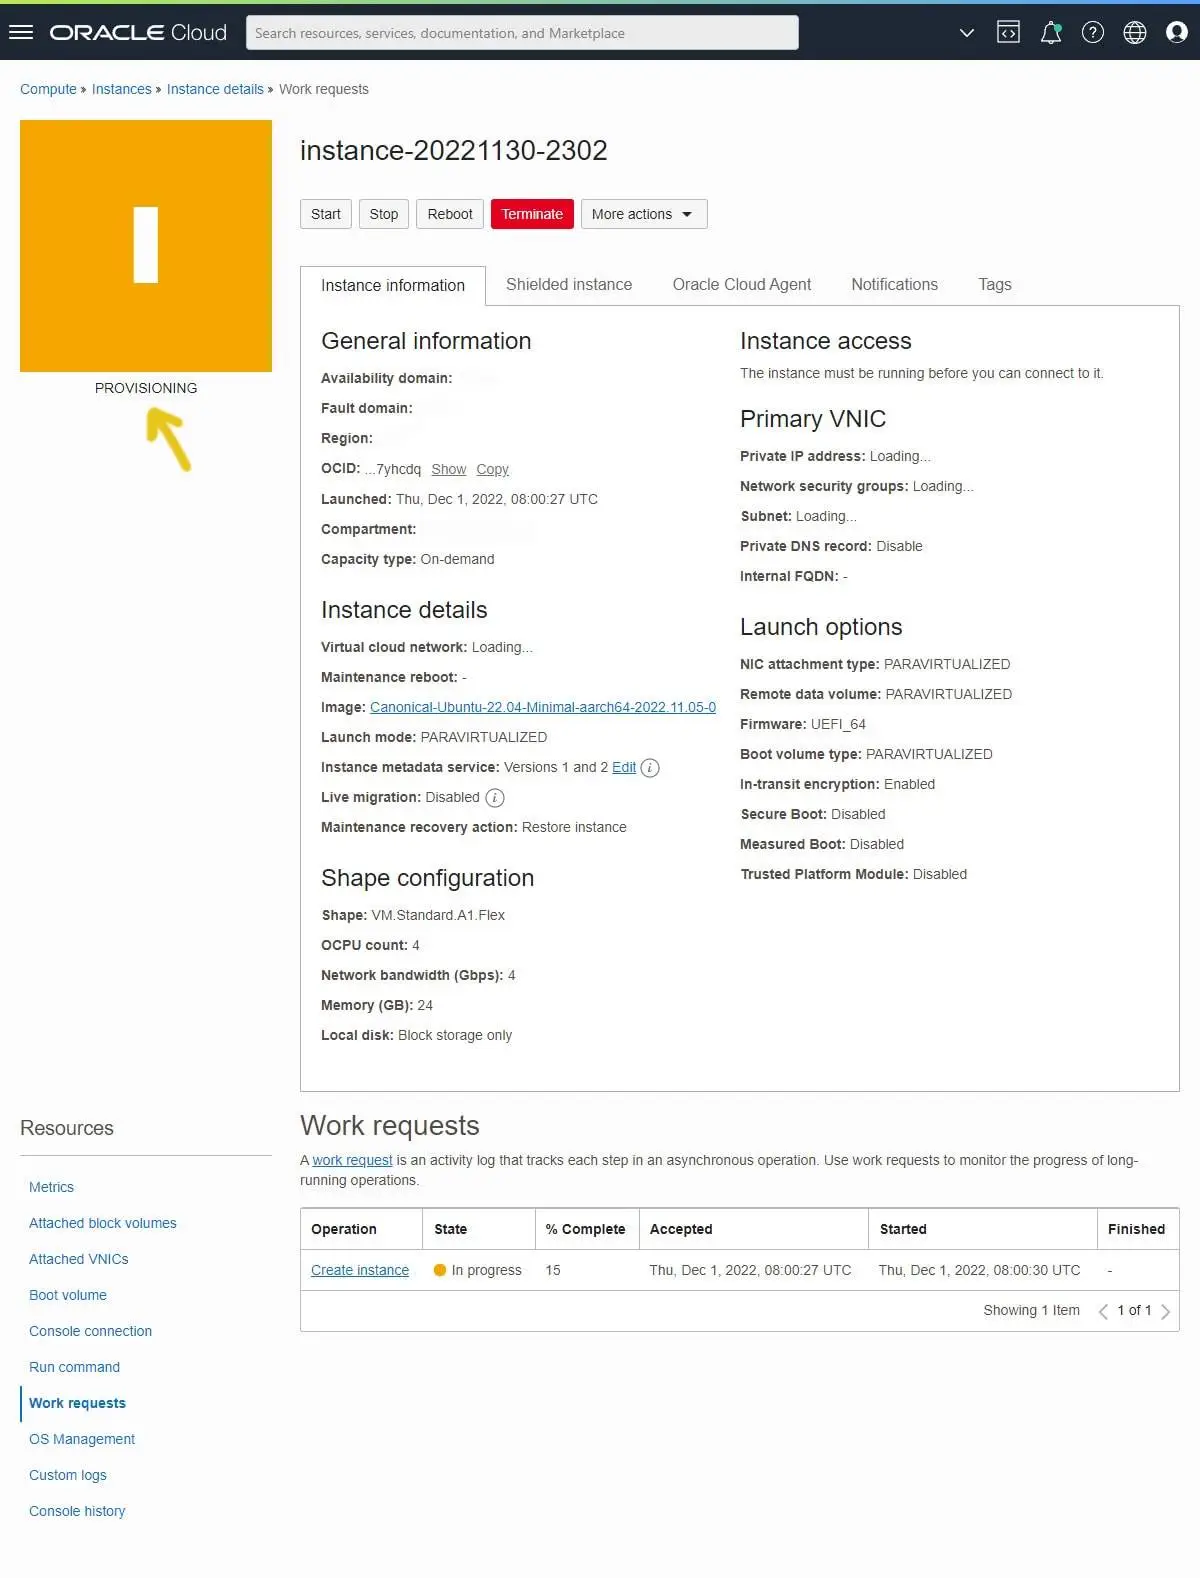 Step 10: when the screen refreshes you'll be back in the Oracle Cloud dashboard on the Instance details screen with your the instance busy provisioning.
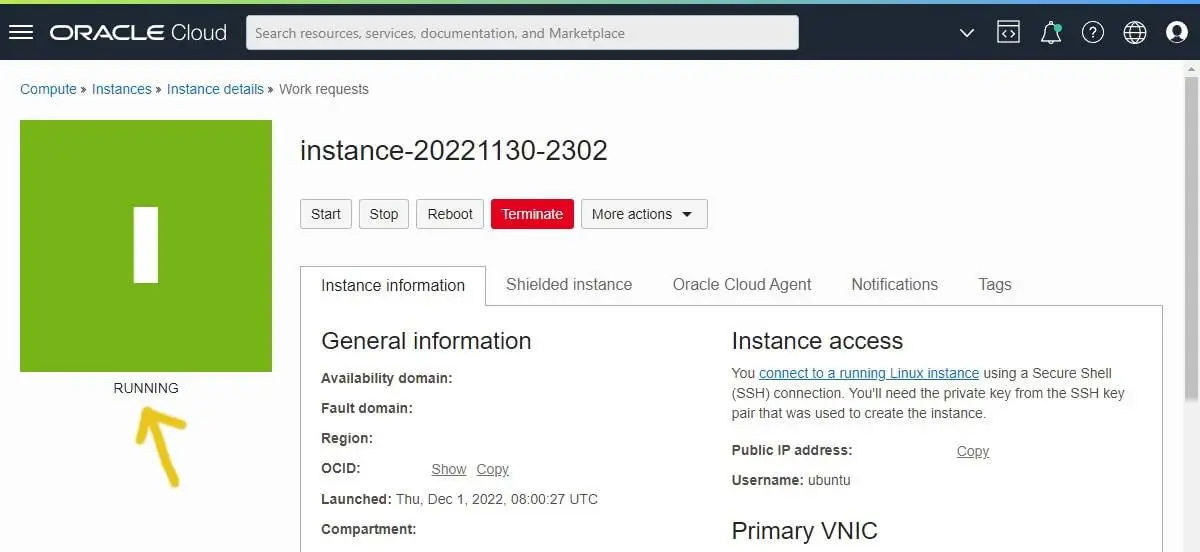 Step 11: in a few minutes the instance will change from provisioning to running but before we connect to it let's dial in our Oracle Cloud firewall.
Let's tune the Oracle Cloud firewall 5 – 10 minutes
If you're familiar with servers you know that they, with few exceptions, use firewalls to allow traffic on certain ports and disallow access to any unspecified ports. The Oracle Cloud dashboard has one which wraps around your instance(s) in addition to the one we'll need to configure inside the ubuntu instance we just brought to life. First, let's handle the Oracle Cloud access rules.
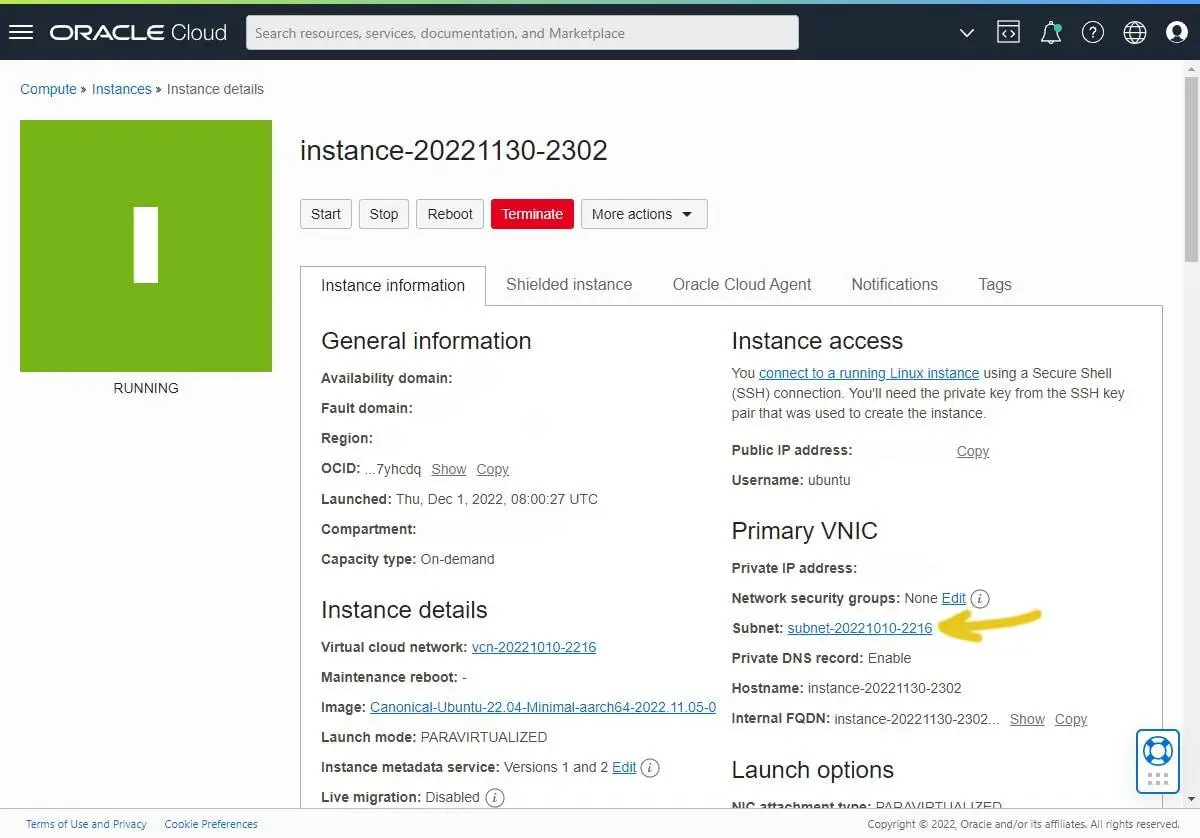 Step 1: on the Instance details page find the Primary VNIC section and click the link on the right side of the Subnet: line.
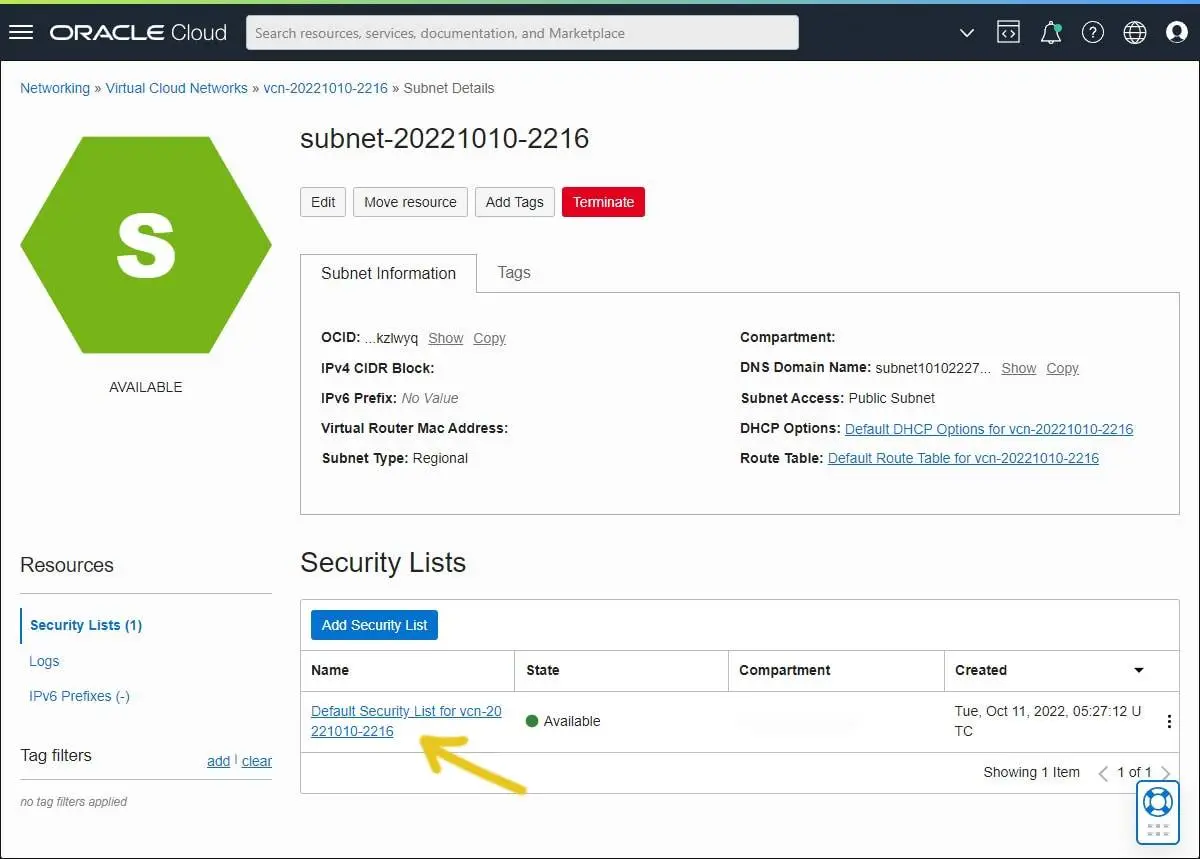 Step 2: on the Subnet details page click the Default Security List link at the bottom or, if one doesn't exist, click the Add Security List button.
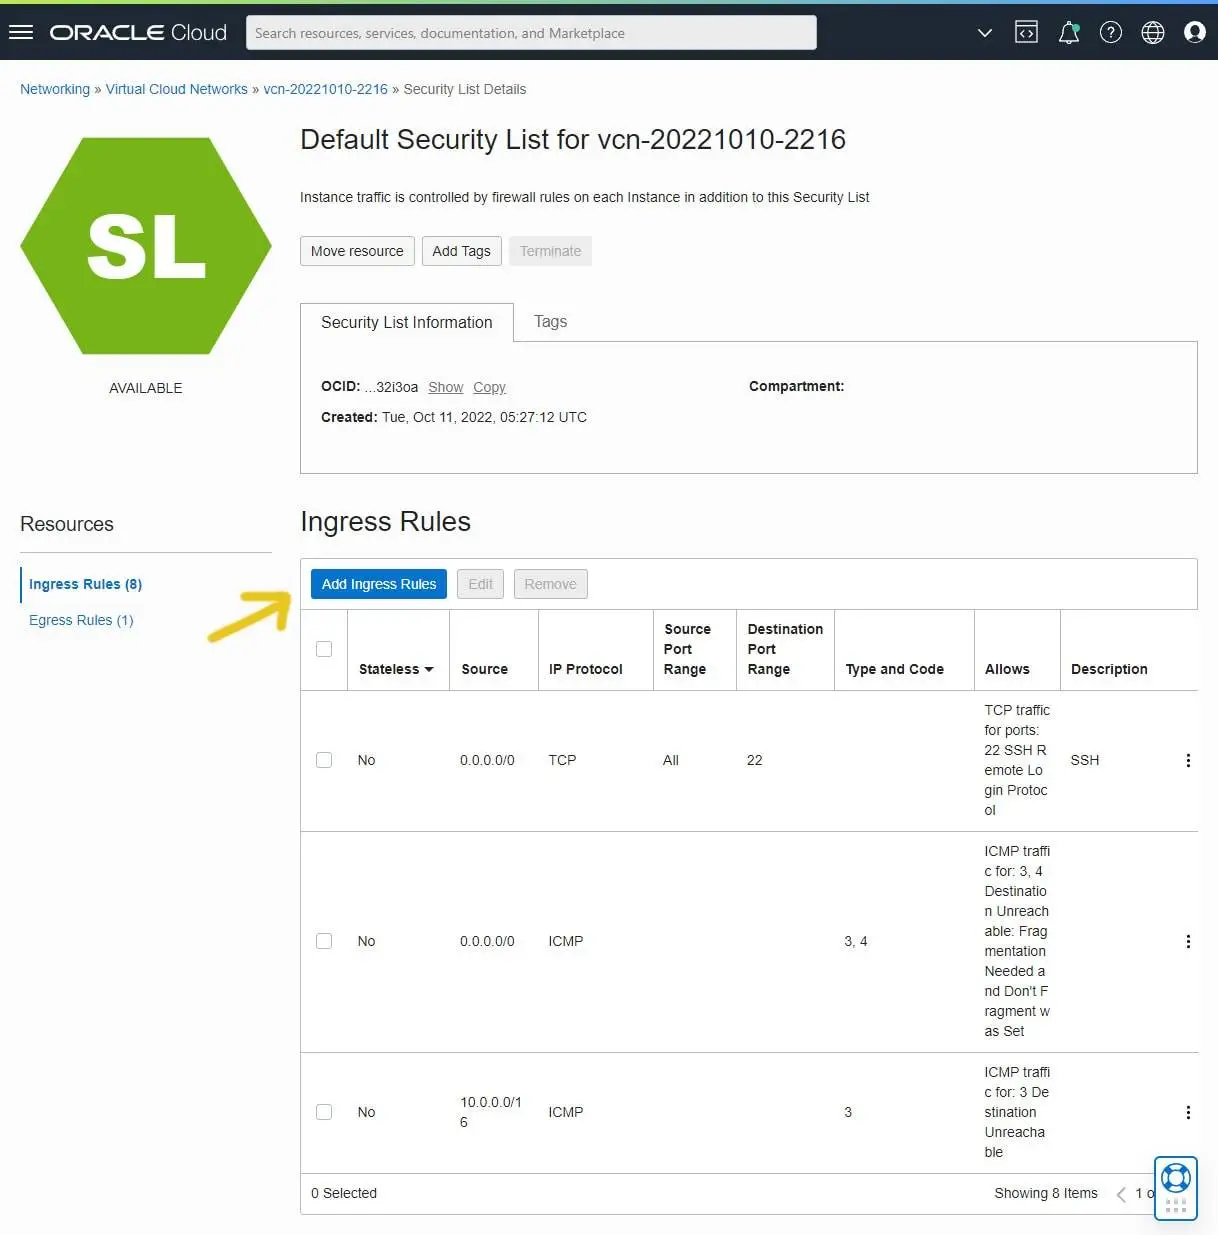 Step 3: on the Security list details page click the Add Ingress Rules button. Please see the next step for an example.
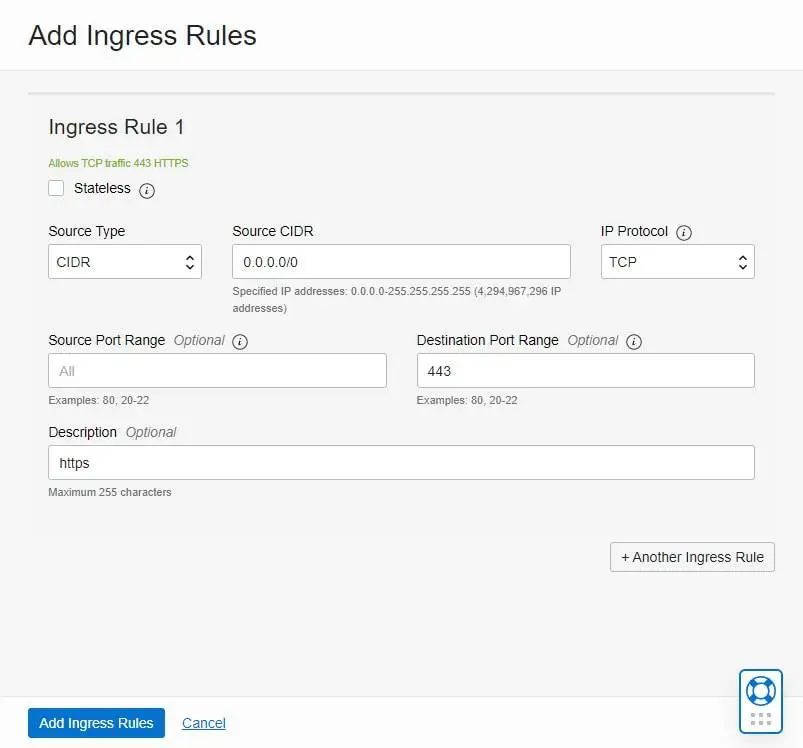 Step 4: an Add Ingress Rules dialogue box will appear. Unless you know what you're doing you might stick to the following example as a guide for future rules:
Source Type: CIDR
Source CIDR: 0.0.0.0/0
IP Protocol: TCP
Source Port Range: blank
Destination Port Range: 443 (or any other port you wish to open)
Description (Optional): Good to use for non-standard ports or as a note if you forget which standard port does what
For my Oracle Cloud Instance I left the following ports open:
SSH: TCP port 22
DNS: TCP+UDP port 53
HTTP: TCP 80
HTTPS: TCP 443
Control panel: TCP unspecified
Please see the following guide if you need a refresher on standard and common port assignments.
Possibly optional: convert your private key to the .ppk format 10 – 15 minutes
Remember the private key downloaded in step 7 of the Create an Oracle Cloud instance section? When Oracle Cloud created the key it saved it in the .key format but some SSH clients won't know what to do with it. Your client may prefer a .ppk private key which stands for PuTTY Private Key and used primarily by, you guessed it, the PuTTY SSH client. If you plan on using PuTTY (or other SSH clients which prefer .ppk private keys) then walk through this section to convert your private key from one to the other.
Step 1: to start please download the PuTTY Key Generator.
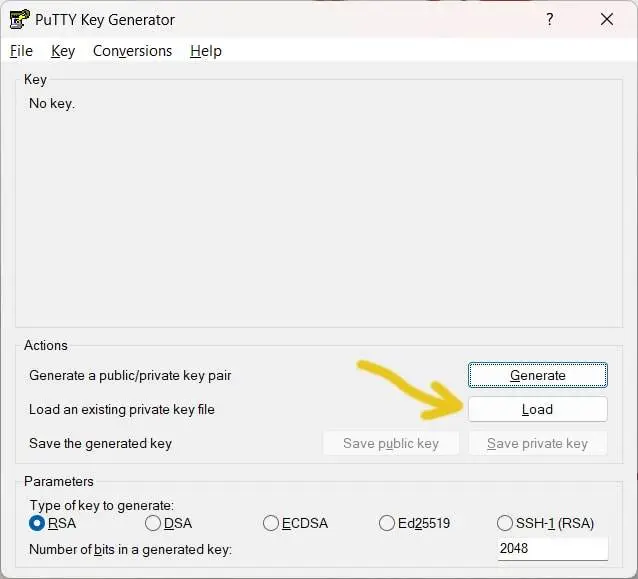 Step 2: open up the PuTTY Key Generator application and click the Load button.
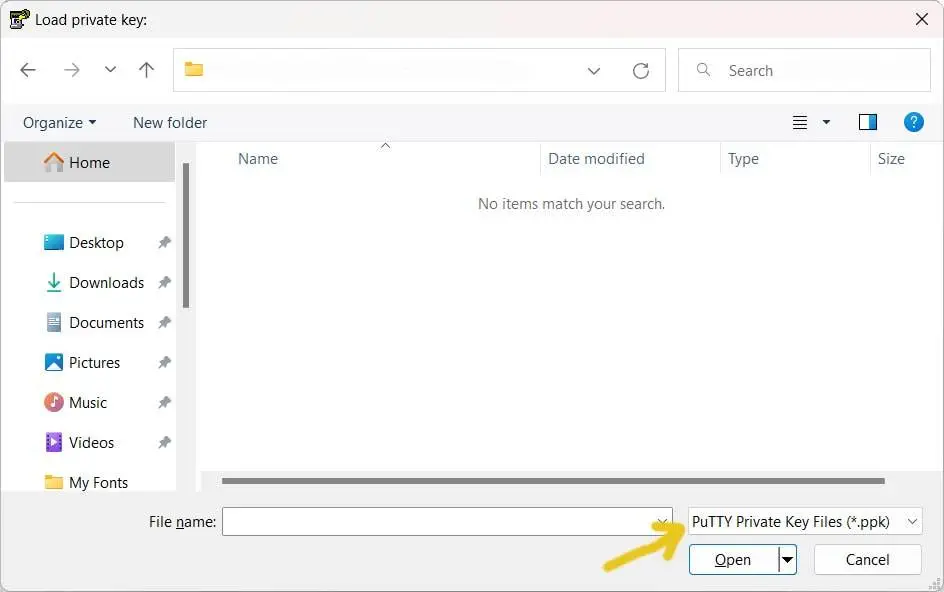 Step 3: navigate to the folder where the Oracle Cloud private key downloaded, then click the dropdown in the bottom-right corner labeled PuTTY Private Key Files (*.ppk) and switch to All Files (*.*)
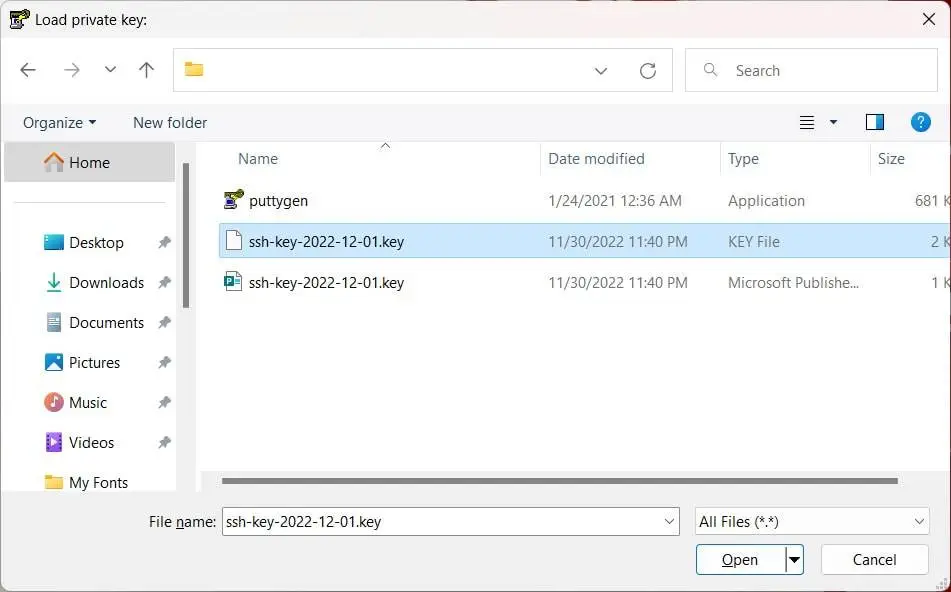 Step 4: select the .key file (not the .key.pub file!) and click the Open button.
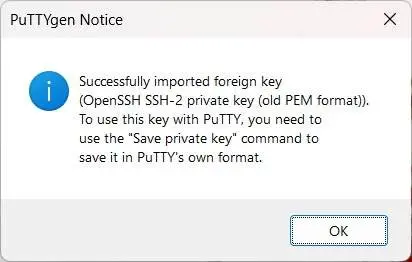 Step 5: a PuTTYgen Notice should appear, to confirm that the private key was successfully imported. Click the OK button.
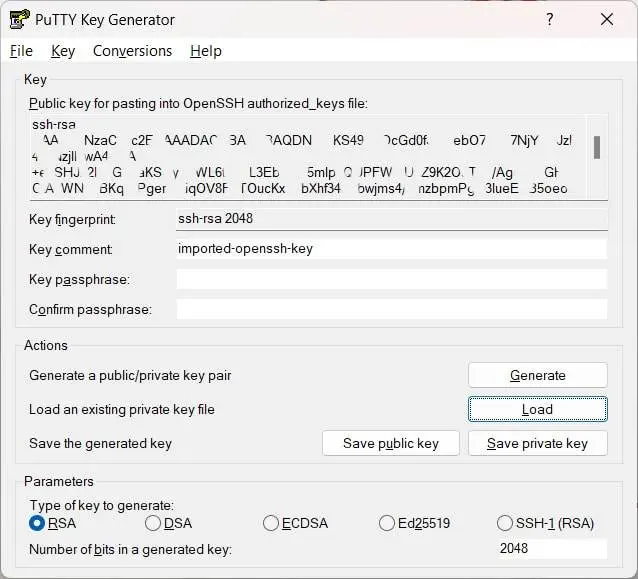 Step 6: you should back on the PuTTY Key Generator main window. Click the Save private key button.
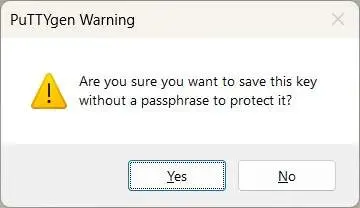 Step 7: click the Yes button to save the new private key without a passphrase.
 Step 8: please select where to save the new PuTTY Private key file, name it, then click the Save button.Yes
Step 9: if you plan to use Bitvise or PuTTY as your SSH client you'll need Pageant to store your keys. Please download it here then launch the application. It will start minimized and stay in memory until you manually close it or reboot.
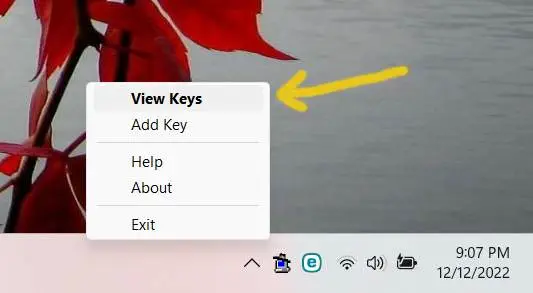 Step 10: with Pageant loaded, either right-click on icon in the system tray then select View Keys or double-click the icon to open it.
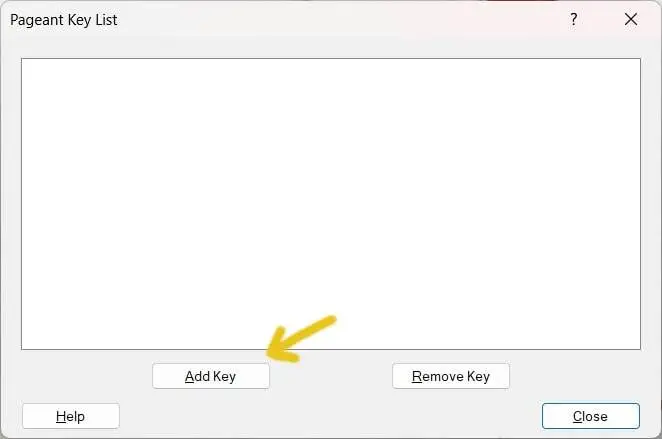 Step 11: you should see the Pageant Key List. Click the Add Key button.
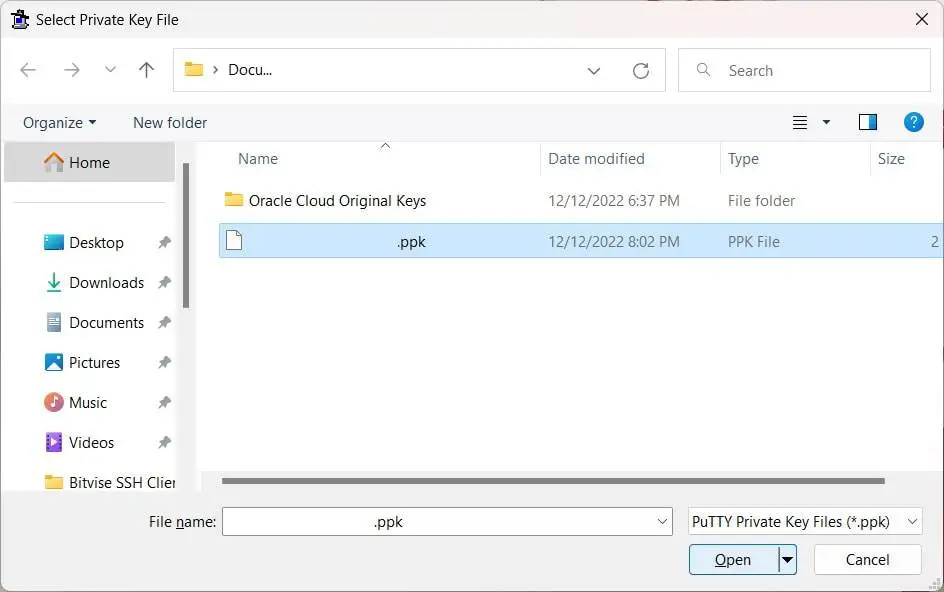 Step 12: select the private key .ppk created in Step H then click the Open button to save it.
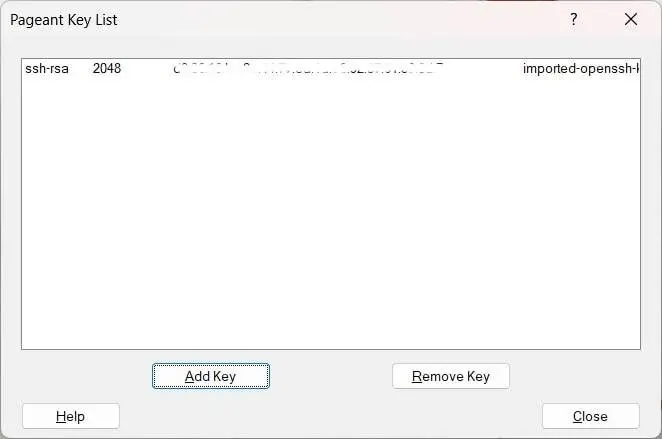 Step 13: back in the Pageant Key List you should see your first entry in the list and now we're finally (finally!!) ready to set up our SSH client and connect to our Oracle Cloud instance. Click the Close button to make the Pageant Key List hide and Pageant will continue to run in the background. You should continue to see the icon for it in the system tray.
! After two weeks of using Pageant more than ever I finally noticed that keys don't reappear in the list after exiting the application. It's an odd user experience to say the least, considering its single-purpose existence. But I'm happy to report there's a way to feed the list of keys to be stored in Pageant's key list when launching the application.
SSH into your Oracle Cloud instance 10 – 15 minutes
Now that we've created an account, spun up an always free tier instance, tuned the Oracle Cloud firewall, and maybe changed the format of our private key it's finally (finally!) time to connect to our server via Secure Shell Protocol (SSH). SSH is a tool used to send text commands to servers via the command-line interface (CLI). But before we connect we need to setup our SSH client.
If you're on Windows the most popular SSH client is probably PuTTY. I'm not sure what Mac peeps use but I would guess it's an application on this list. What do I use? Well, after hitting a few snags with PuTTY over the years I dug around until I found something I preferred: Bitvise SSH Client. (Full disclosure: I'm a happy Bitvise customer who paid $39.95 for a license and have no other ties.) This section will based on Bitvise but it should be easy enough to port the settings over to your favorite SSH client.
Step 1: if your SSH client needs Pageant to house your private key(s) please start the application and make sure your key appears in the list. Refer to the previous section as needed.
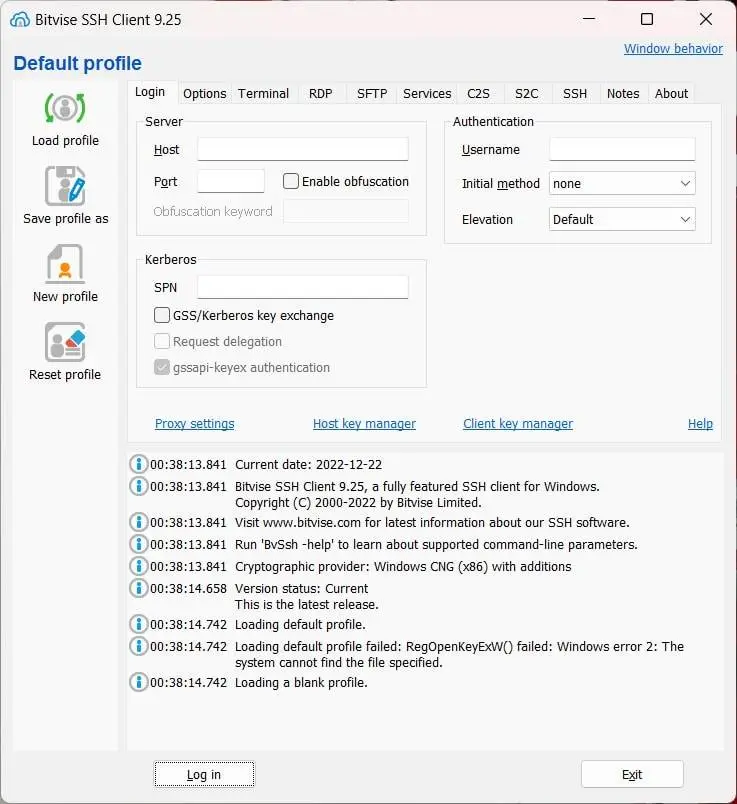 Step 2: open your SSH client application.
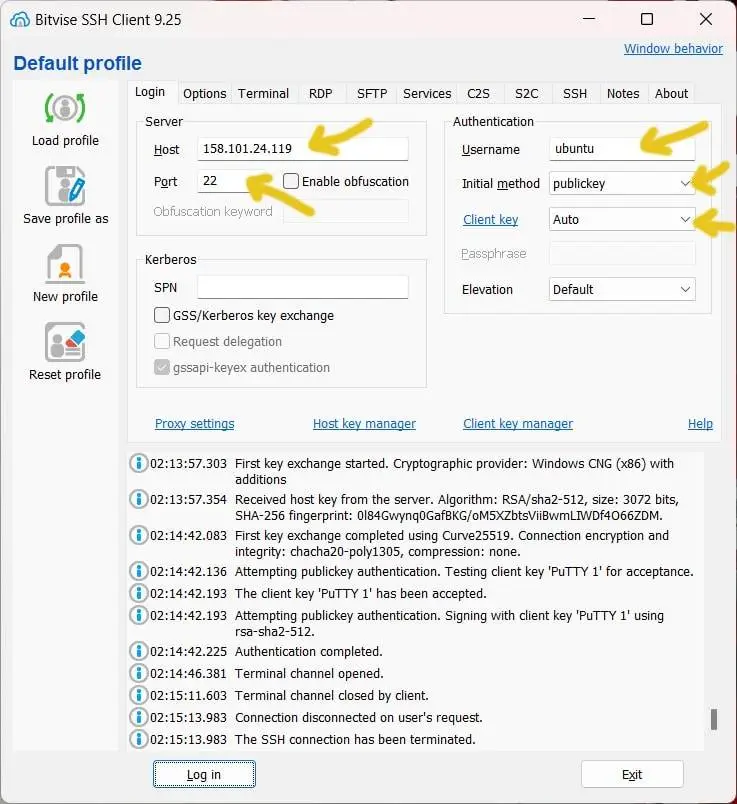 Step 3: now to set up our first SSH profile with the following details…
Host: the Public IP address found on the Instance details page of the Oracle Cloud dashboard (as seen in Step 11 of the Create an Oracle Cloud instance section)
Port: 22
Username: ubuntu
Authentication method: public key
Client key: Auto worked for me, but PuTTY 1 tells the SSH Client to talk to Pageant and use the first private key in the list if you have more than one in the future
! The next two steps are my absolute favorite moment building new servers. The feeling you get when everything is connected right and the terminal pops open for the first time feels like magic.
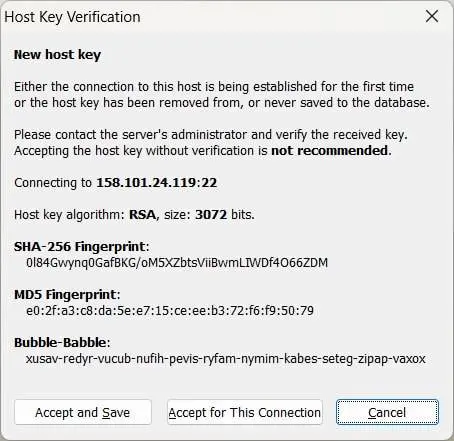 Step 4: open the connection and if everything worked your SSH client should pop up a notice to accept the host key. Click to accept.
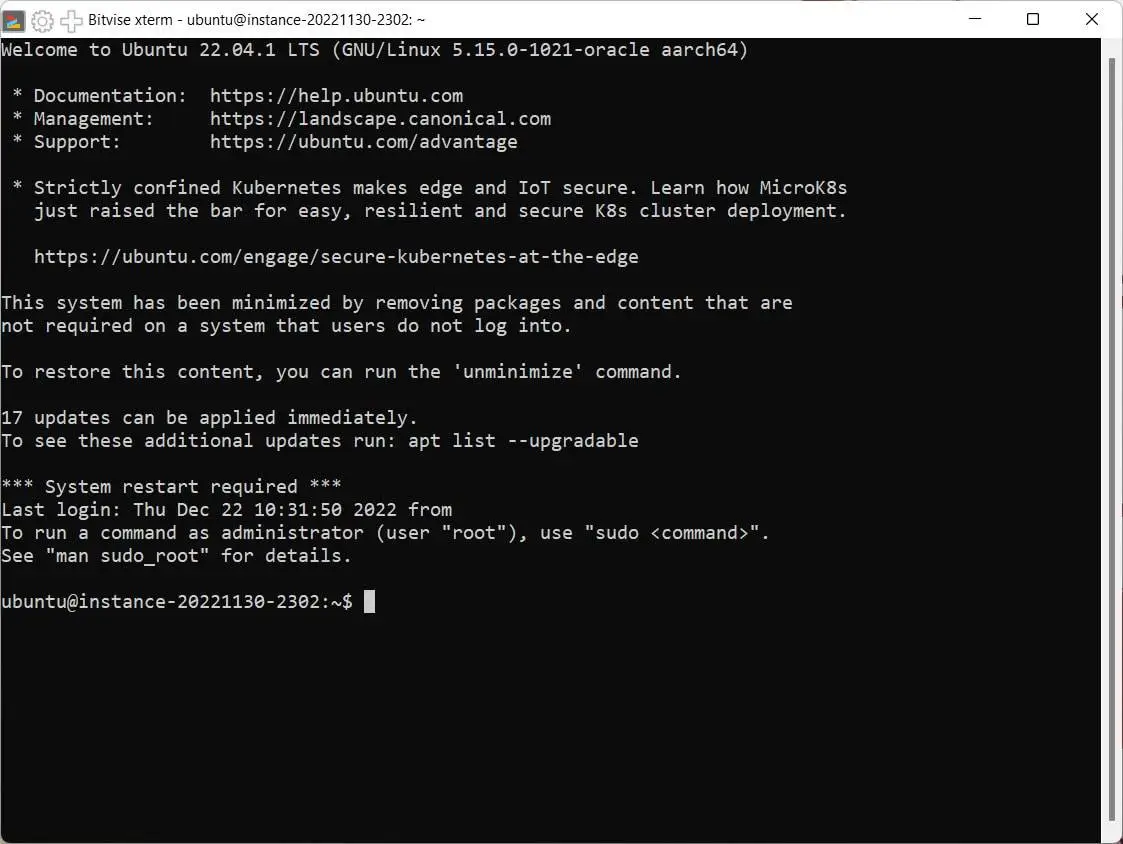 Step 5: *hacker voice* we're in.
Let's update the software on the server now.
! Pro tip: you don't have to type all the commands in the the next two sections. Highlight the text, copy it, and paste it into the SSH terminal using a right-click (Windows). Mac users will obviously need to do something different.
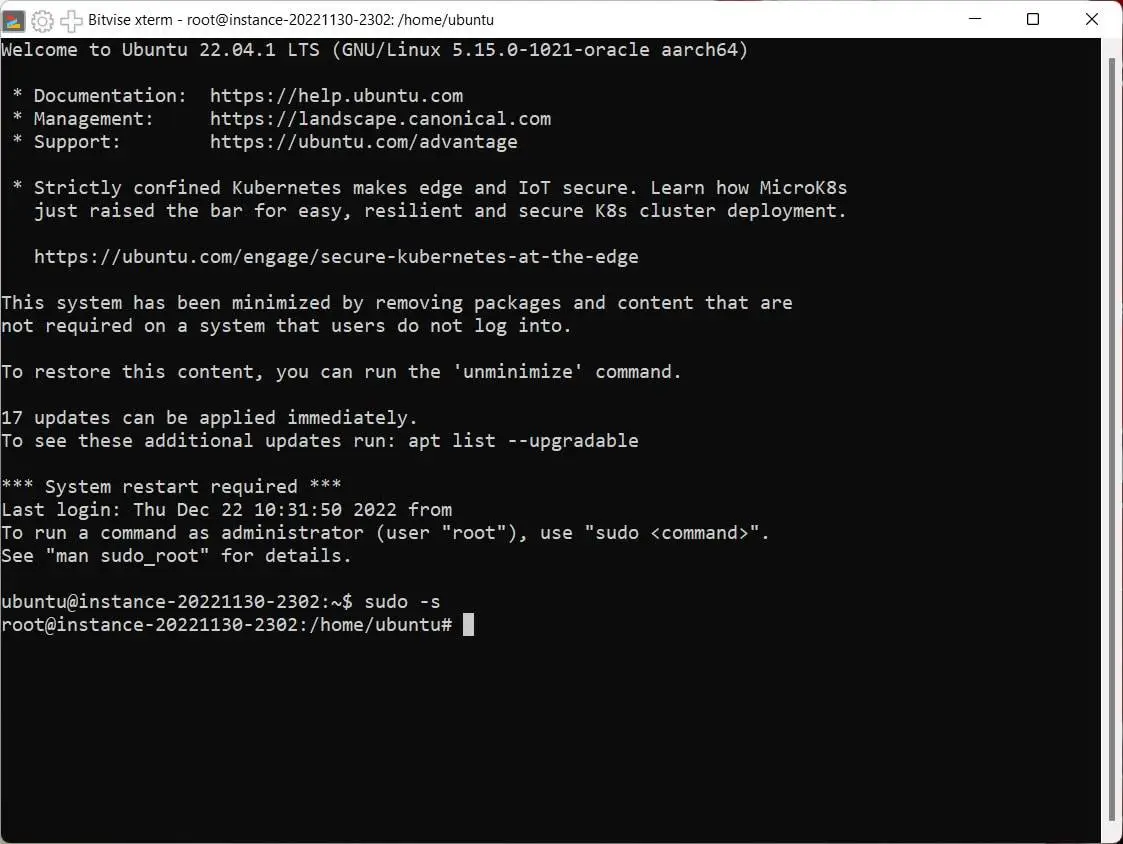 Step 6: this step may be a little controversial but I like to grant the user (ubuntu) root access using the
 sudo -s command. I find it annoying to repetitively preface almost every command with sudo so this allows me to grant root-level permissions once, used at the start of the session.
! A necessary warning: if you miskey certain commands you can absolutely hose your entire server and if you can't fix it from the Oracle Cloud dashboard using a Cloud Shell connection you'll need to terminate the instance and start over. Cool? Cool.
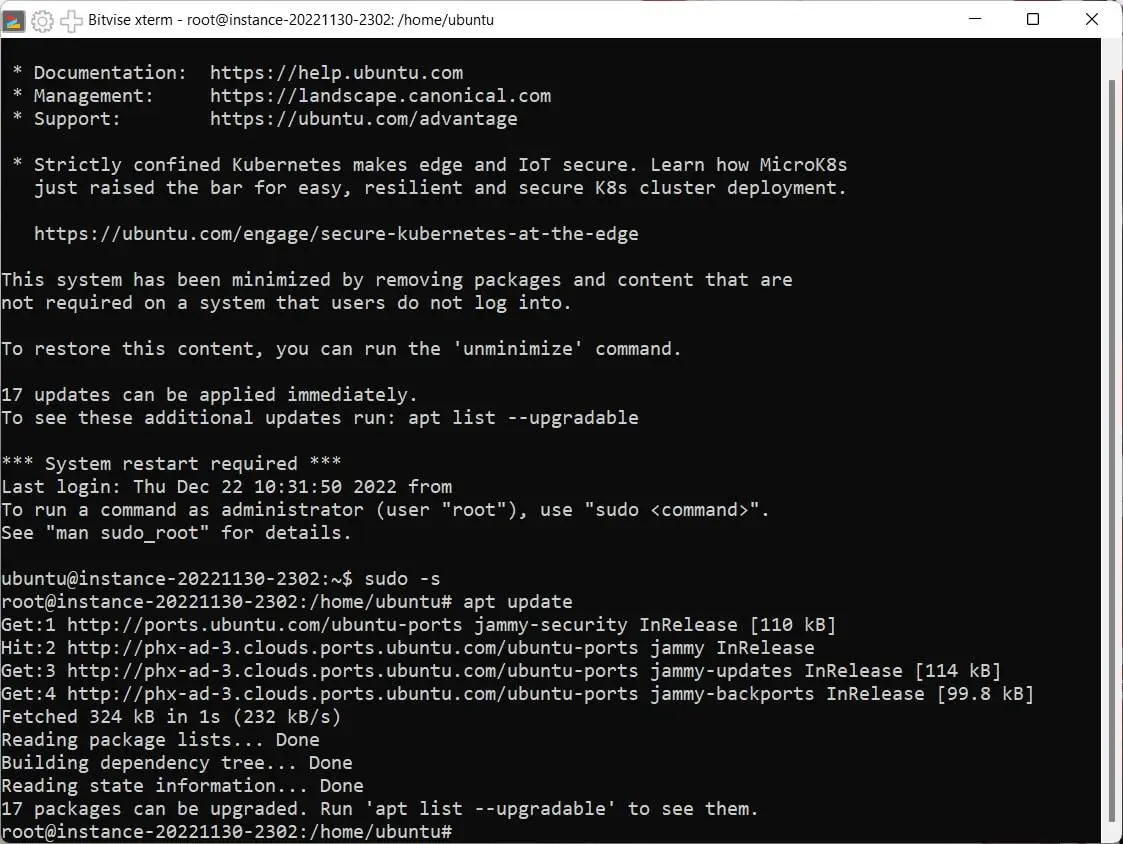 Step 7: type
 apt update to see if there are updates available for Ubuntu and other software installed on the server.
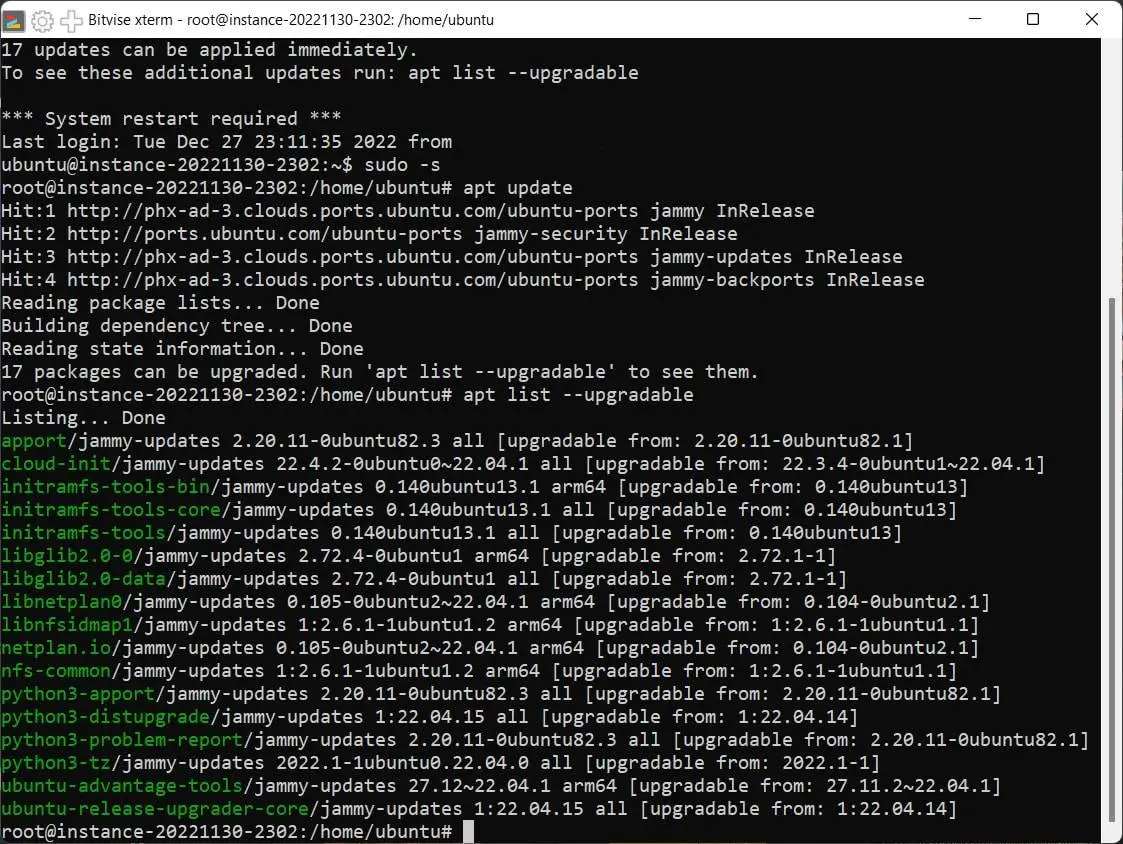 Step 8: type
 apt list --upgradable to see the list of items to be updated, which is generally considered a good idea.
 Step 9: type
 apt upgrade to install the updates. You will be prompted to accept the increase (and from time to time, a decrease) in hard drive space used. Press y to continue.
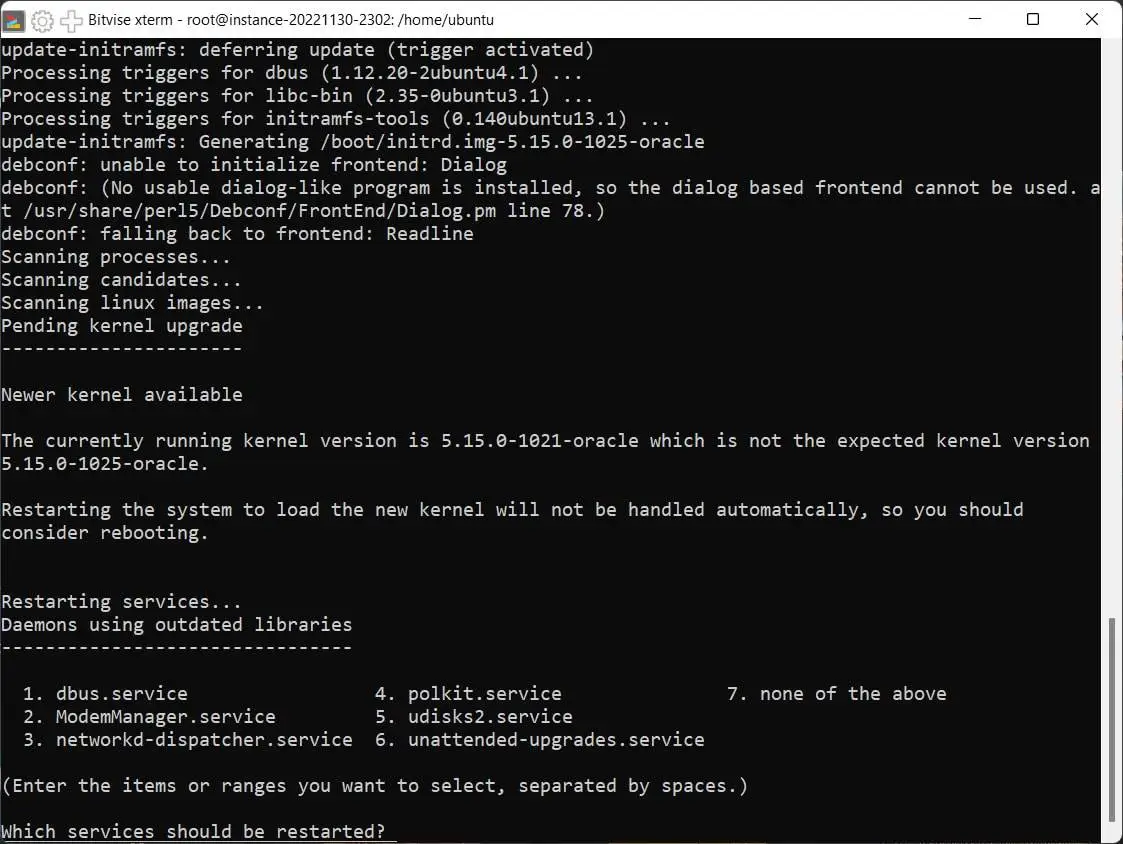
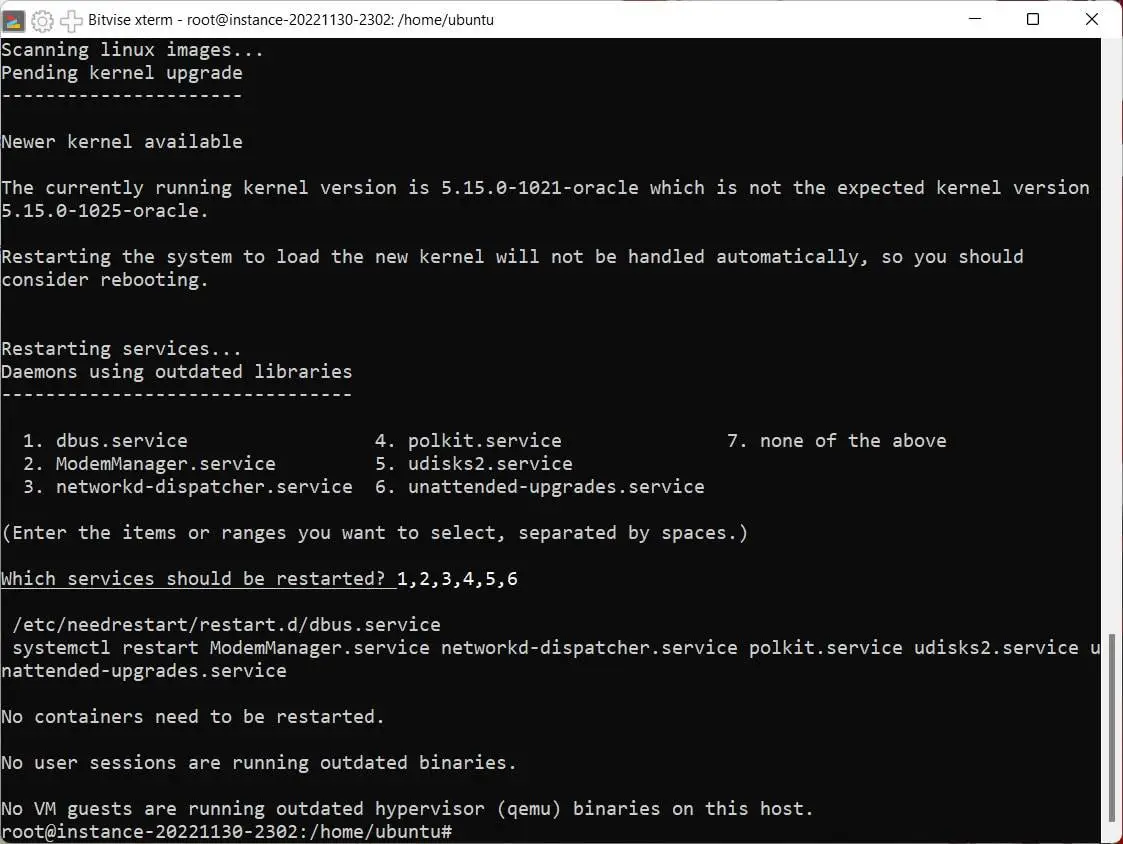 Step 10: this particular update noted some daemons (read: services) were now running outdated to libraries and asked which we would like to restart. I restarted every one by typing
 1 2 3 4 5 6.
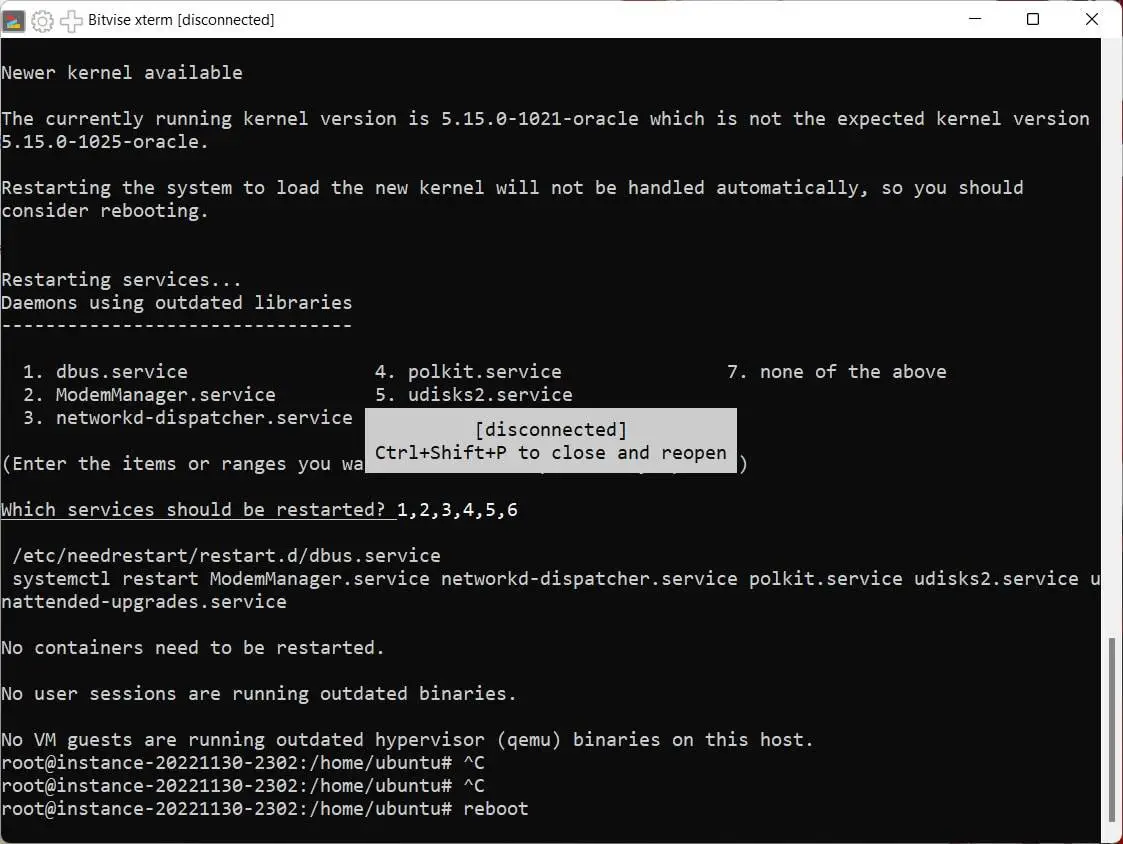 Step 11: the update also mentioned restarting the system to load the new kernel will not be handled automatically, so you should consider rebooting and we should do that now. Type
 reboot. Almost immediately your SSH client should alert you that the connection was lost. Wait about 20 seconds then try the connection again.
Configure the Ubuntu Firewall 5- 10 minutes
With SSH dialed in and the server software updated next we need to add rules to open ports in the the firewall built into Oracle Cloud's Ubuntu image. Most server administrators will be saddened to learn there's a compatibility issue with Ubuntu's Uncomplicated Firewall (UFW) and it's disabled on purpose so we'll need to work with iptables directly. Please keep the Oracle Cloud documentation open as we're going to use parts of it soon.
Step 1: are you still connected to your Oracle Cloud instance via SSH? If not please reconnect and type sudo -s to grant yourself root access again.
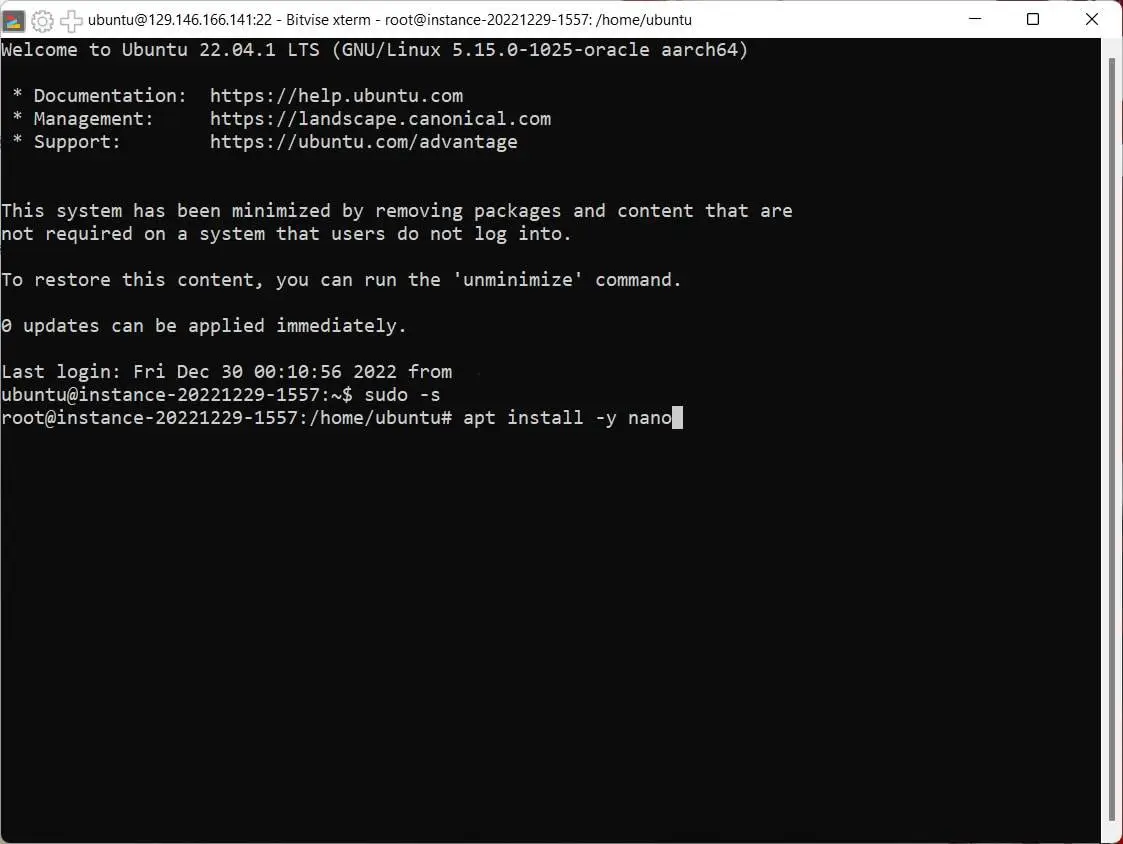 Step 2: we need to install a text editor. Please copy and paste
 apt install nano -y (the -y switch auto-accepts the additional use of space so the installation completes automatically) to install Nano. If you prefer a different a different command-line text editor feel free to install it at this point.
! If you end up disliking Nano for some reason, not a problem, here's a list of alternative command-line text editors you might try in the future.
Step 3: let's backup the iptables rules mentioned in the Oracle Cloud documentation before we edit the file. Copy and paste cp /etc/iptables/rules.v4 /etc/iptables/rules.v4.backup into your SSH terminal then hit enter.
Step 4: now copy and paste nano /etc/iptables/rules.v4 into the SSH terminal and hit enter.
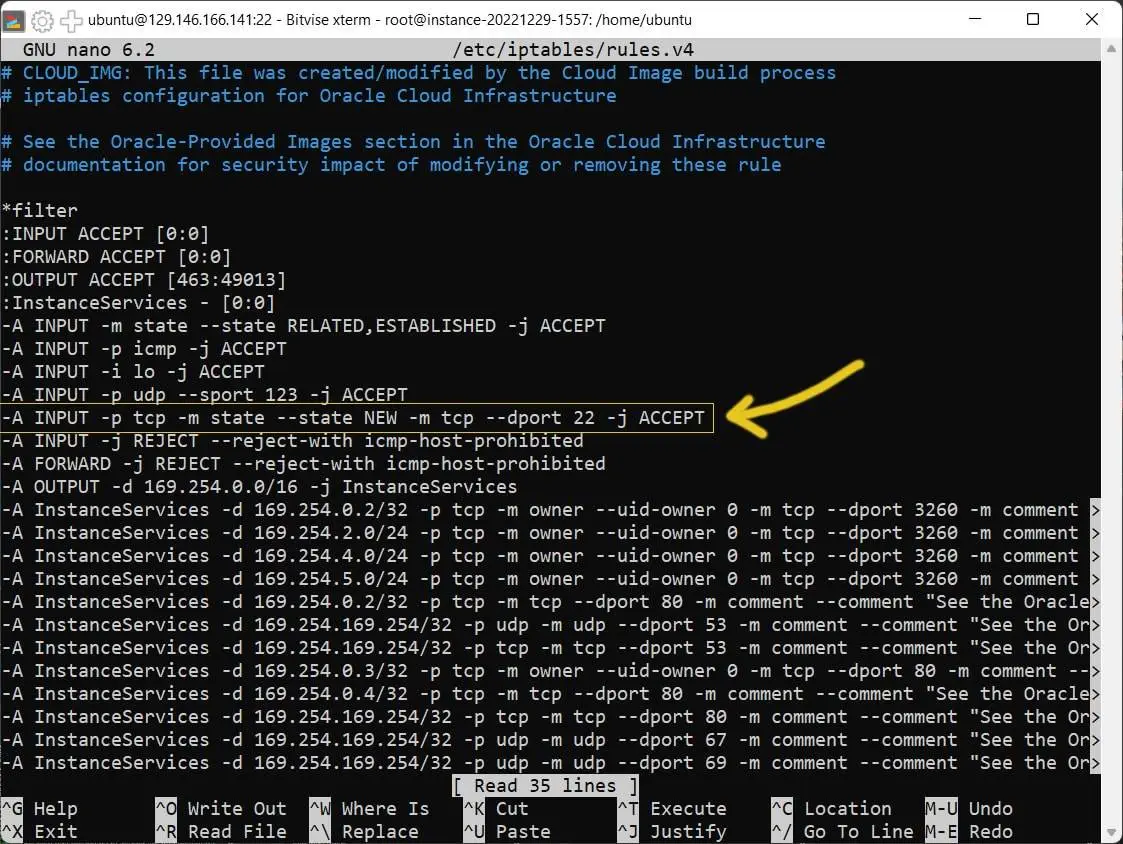 Step 5: Nano will load with /etc/iptables/rules.v4 open. Look for the following line:
 -A INPUT -p tcp -m state --state NEW -m tcp --dport 22 -j ACCEPT. This line opens port 22 for SSH connections.
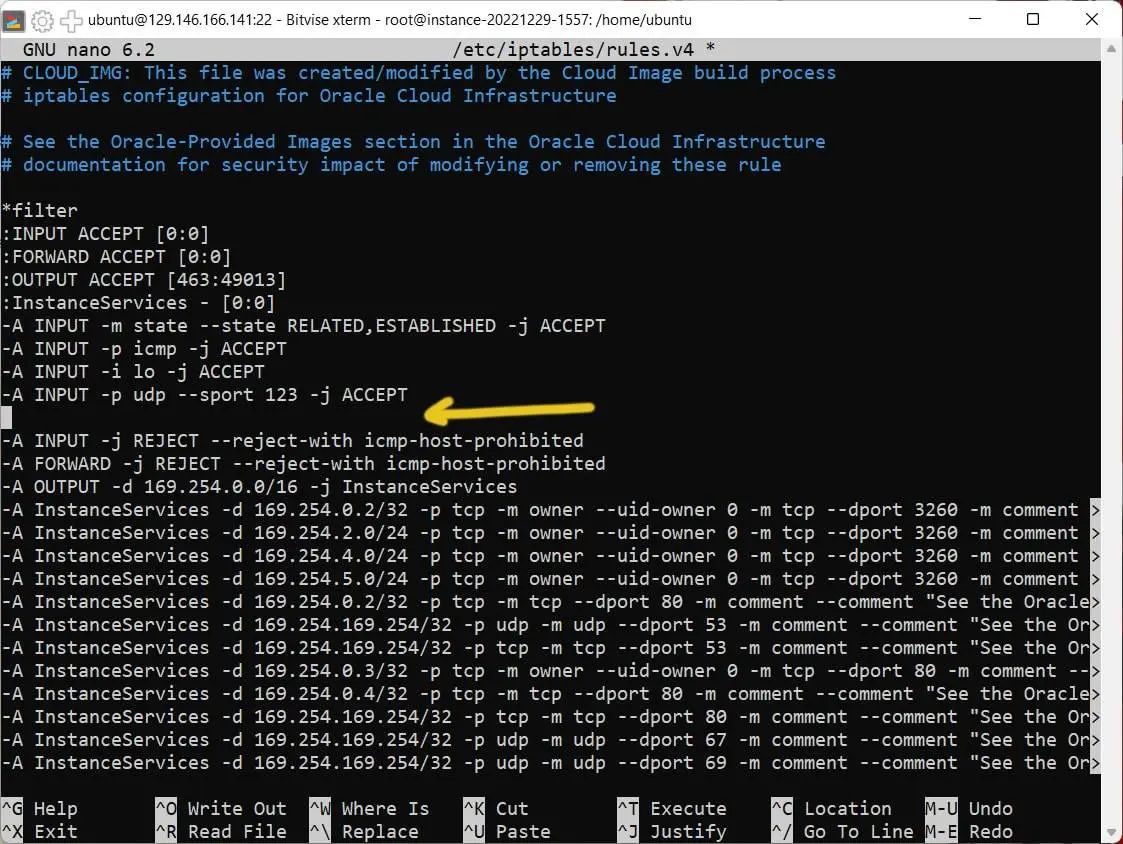 Step 6: use your keyboard's arrow keys to navigate to the start of the
 -A INPUT -p tcp -m state --state NEW -m tcp --dport 22 -j ACCEPT line and hit delete until the line is blank. Keep the blank line there because the next step it to paste two lines of text.
 Step 7: copy the following two lines of code and paste them into your SSH terminal window:
-A INPUT -p tcp -m state --state NEW,ESTABLISHED -m multiport --dports 22,53,80,443 -j ACCEPT
-A INPUT -p udp -m state --state NEW,ESTABLISHED -m multiport --dports 53 -j ACCEPT
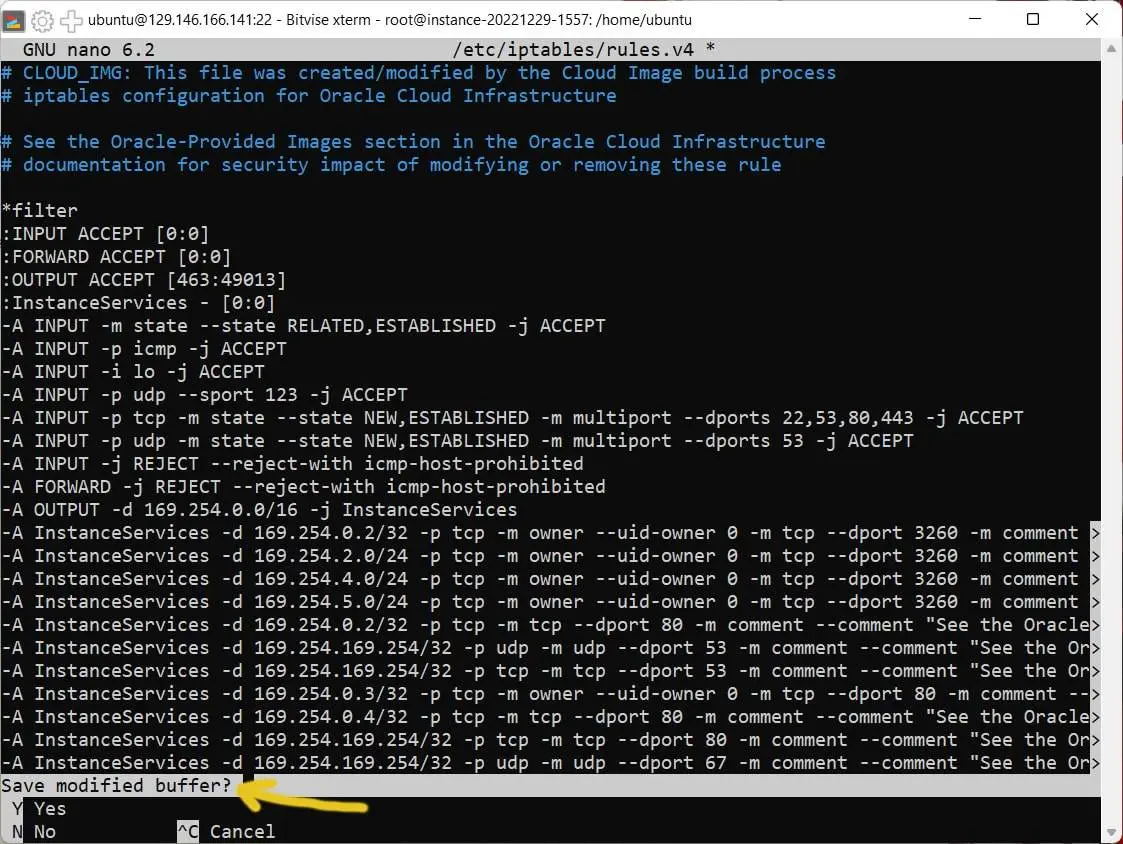 Step 8: if everything looks right hit
 Ctrl + X on your keyboard to Save the modified buffer then the Y key to accept, then the enter key to save the file to /etc/iptables/rules.v4.
Step 9: to reload iptables with the changes copy and paste iptables-restore < /etc/iptables/rules.v4 into the SSH terminal and hit enter. If no errors appear we should be able to disconnect SSH and reconnect with no issue.
So that's it for all the setup needed before layering in a control panel. Now it's in your hands to choose one from the first section and give it a roll. The worst thing that could happen is you end up hating it, in which case you just have to terminate the instance, spin up a new one, set up the environment, and install a new control panel. I've run through the process about a dozen times and can assure you it takes about thirty minutes start to finish when you're proficient with the steps.
Control Panel #1: aaPanel 1 - 2 hours
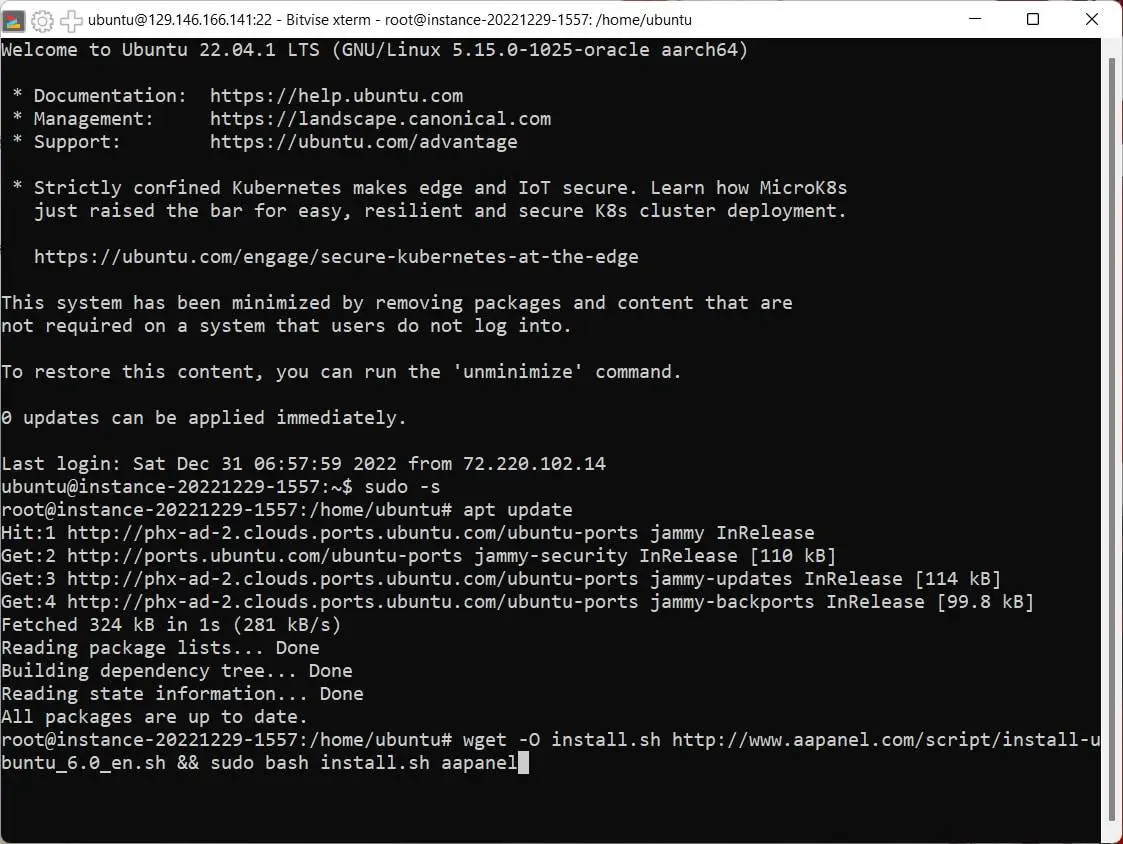 Step 1: if you're not already connected via SSH to your Oracle Cloud instance please do so then type
 sudo -s then enter to switch to the root user. Next, copy and paste wget -O install.sh http://www.aapanel.com/script/install-ubuntu_6.0_en.sh && sudo bash install.sh aapanel into the SSH terminal and hit enter.
! Note: the origin of aaPanel's installation command came from the aaPanel download page which, it turns out, contained several nuggets used to troubleshoot or undo mistakes made when trying to get aaPanel fully installed. I'm noting here as a valuable resource other people may need behind me.
Step 2: the aaPanel install script will ask Do you want to install aaPanel to the /www directory now? (y/n). Hit the y key to agree and continue the installation.
Step 3: next the install script will ask Do you need to enable the panel SSl? (y/n). Hit the n key so the control panel installs without SSL. If you install aaPanel from an IP instead of a subdomain the SSL certificate fails to register and the panel won't load correctly so we need to circumvent it for now. Don't worry, we're going to add one later after we install a webserver and database.
 Step 4: at the end of the installation you should see a success message similar to the one below. Please copy and paste it into a text editor as we'll need the aaPanel internet address, username, and password in seven steps from now.
==============================================
Congratulations! Installed successfully!
==============================================
aaPanel Internet Address: http://129.146.166.141:7800/41260453
aaPanel Internal Address: http://10.0.0.133:7800/41260453
username: tiuwqlco
password: 72401925
Warning:
If you cannot access the panel,
release the following port (7800|888|443|80|21|20) in the security group
==============================================
Step 5: unfortunately for us, during installation aaPanel added UFW to the server and it needs to be removed. To start, disable UFW by typing ufw disable and hit enter.
Step 6: now let's uninstall it and delete the files as well. Please copy and paste the following into the SSH terminal and hit enter after each command:
apt remove -y ufw
apt purge -y ufw
Step 7: with UFW gone we need to edit the iptables rules and modify one to open two new ports as we did in Steps 4 - 9 in the Configure the Ubuntu Firewall section. Please copy and paste nano /etc/iptables/rules.v4 into the SSH terminal and hit enter.
! we're about to add 888 and 7800 to the list of iptables open ports. In aaPanel's world port 888 is for phpMyAdmin and 7800 is the default port for the panel.
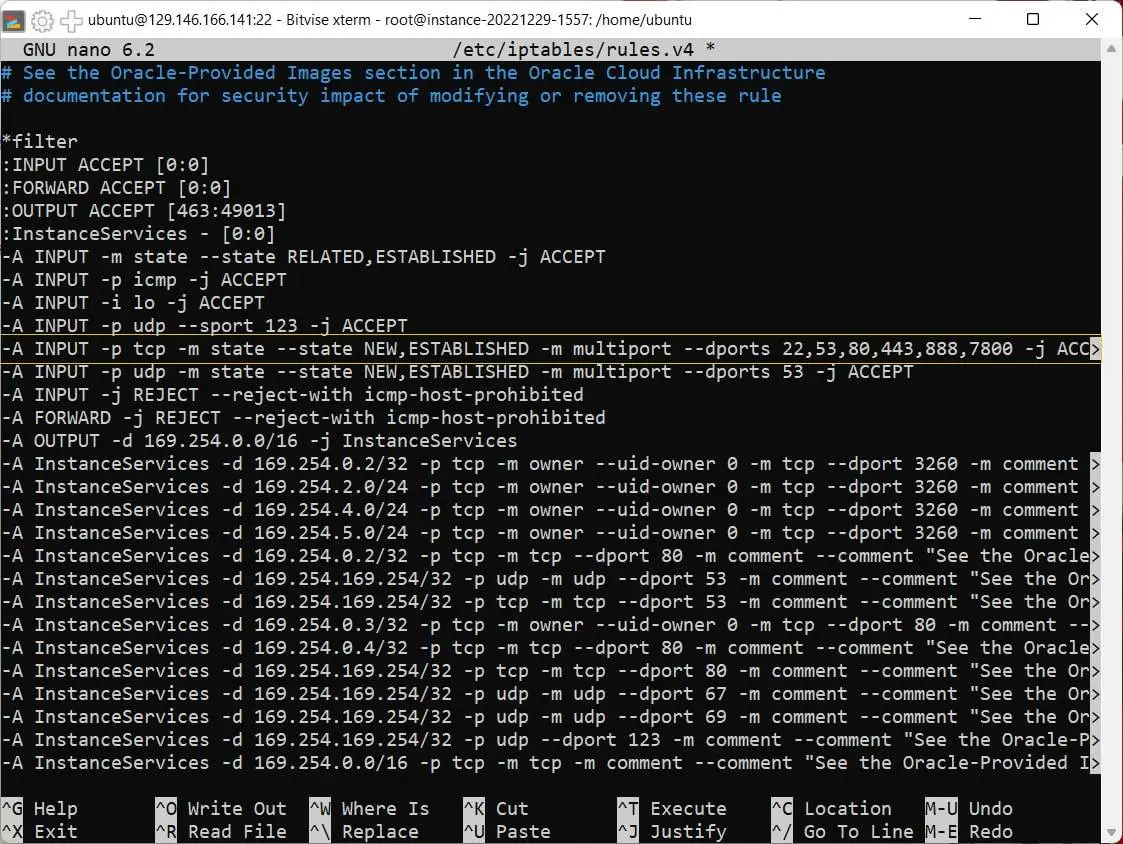 Step 8: look for the line which reads
-A INPUT -p tcp -m state --state NEW,ESTABLISHED -m multiport --dports 22,53,80,443 -j ACCEPT
and add ,888,7800 to the end of the port list so the entire line looks like this:
-A INPUT -p tcp -m state --state NEW,ESTABLISHED -m multiport --dports 22,53,80,443,888,7800 -j ACCEPT
Step 9: if everything looks right hit Ctrl + X on your keyboard to Save the modified buffer then Y to accept the changes, then enter to save the file to /etc/iptables/rules.v4.
Step 10: to reload iptables with the changes copy and paste iptables-restore < /etc/iptables/rules.v4 into the SSH terminal and hit enter. If we did everything correctly no errors should appear.
Step 11: be sure to login to the Oracle Cloud dashboard and add ingress rules for ports 888 and 7800 to the Security list details page as we covered in Steps 3 - 4 of the Let's tune the Oracle Cloud firewall section.
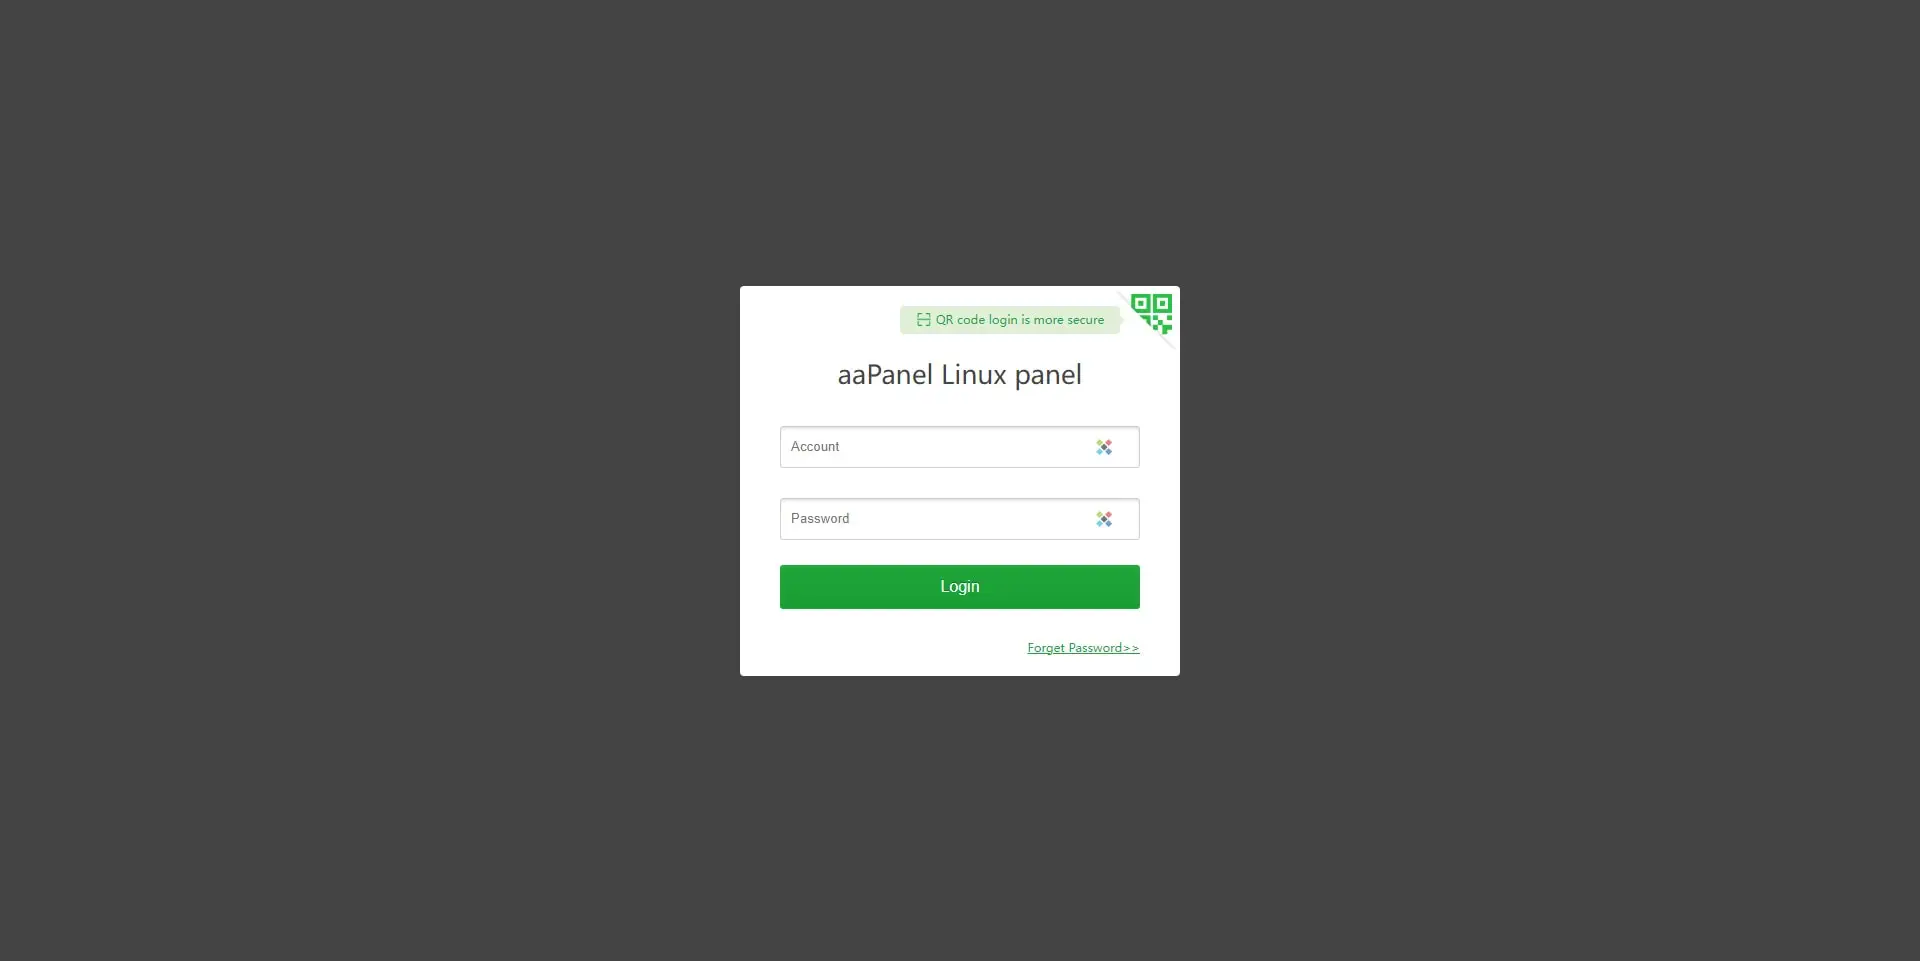
Step 12: log in to aaPanel using the URL, username, and password saved to a text editor back in Step 4 of this section. If you forgot to save it, not a problem, type bt 14, hit enter. To see the full list of commands you can send aaPanel just type bt.
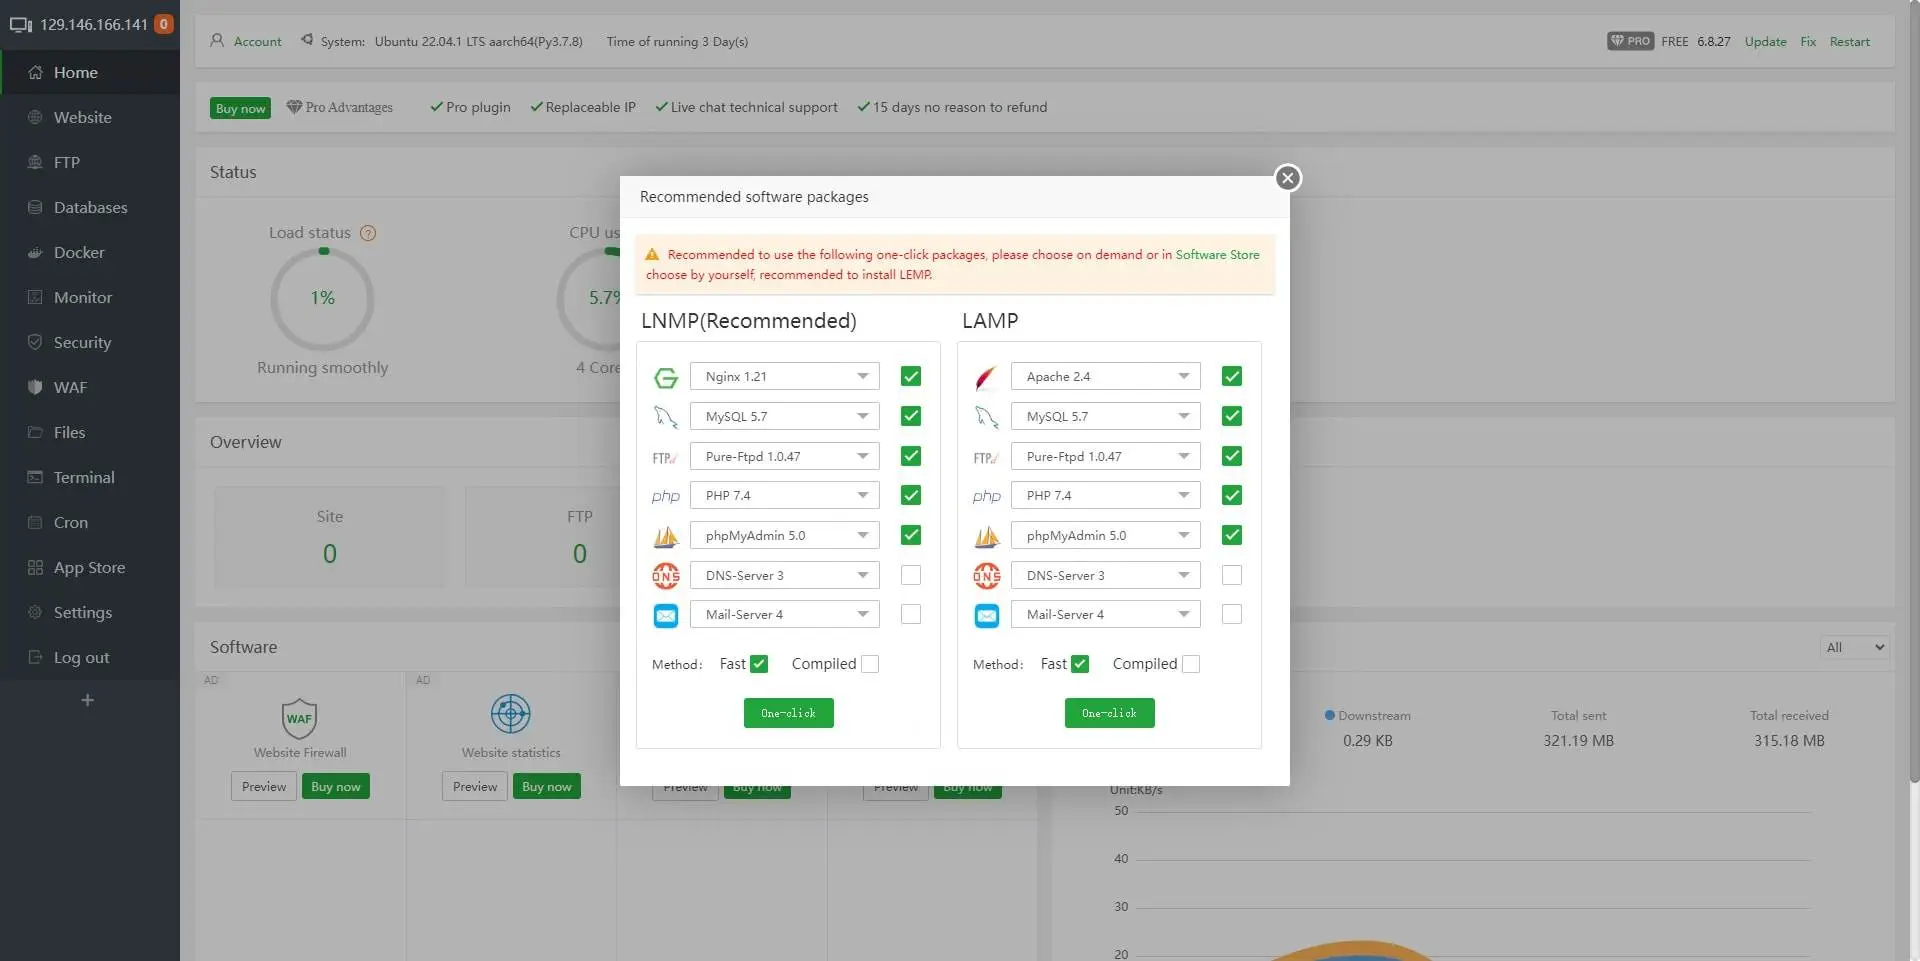 Step 13: after logging in for the first time you will be prompted to select a stack to install. I found success with the following LAMP stack with the "fast" (precompiled) versions:
Apache 2.4
MariaDB 10.3
PureFTP 1.0.49
phpMyAdmin 4.9
! There are some concerns with aaPanel's readiness for production environments. I tried to install three different versions of MariaDB (10.7 compiled, 10.0 'fast', 10.0 compiled) and none would install correctly until I tried 10.3 'fast'. There was also a hiccup with installing PureFTP, none of which inspired confidence so at this point my recommendation is to try Hestia or TinyCP instead.
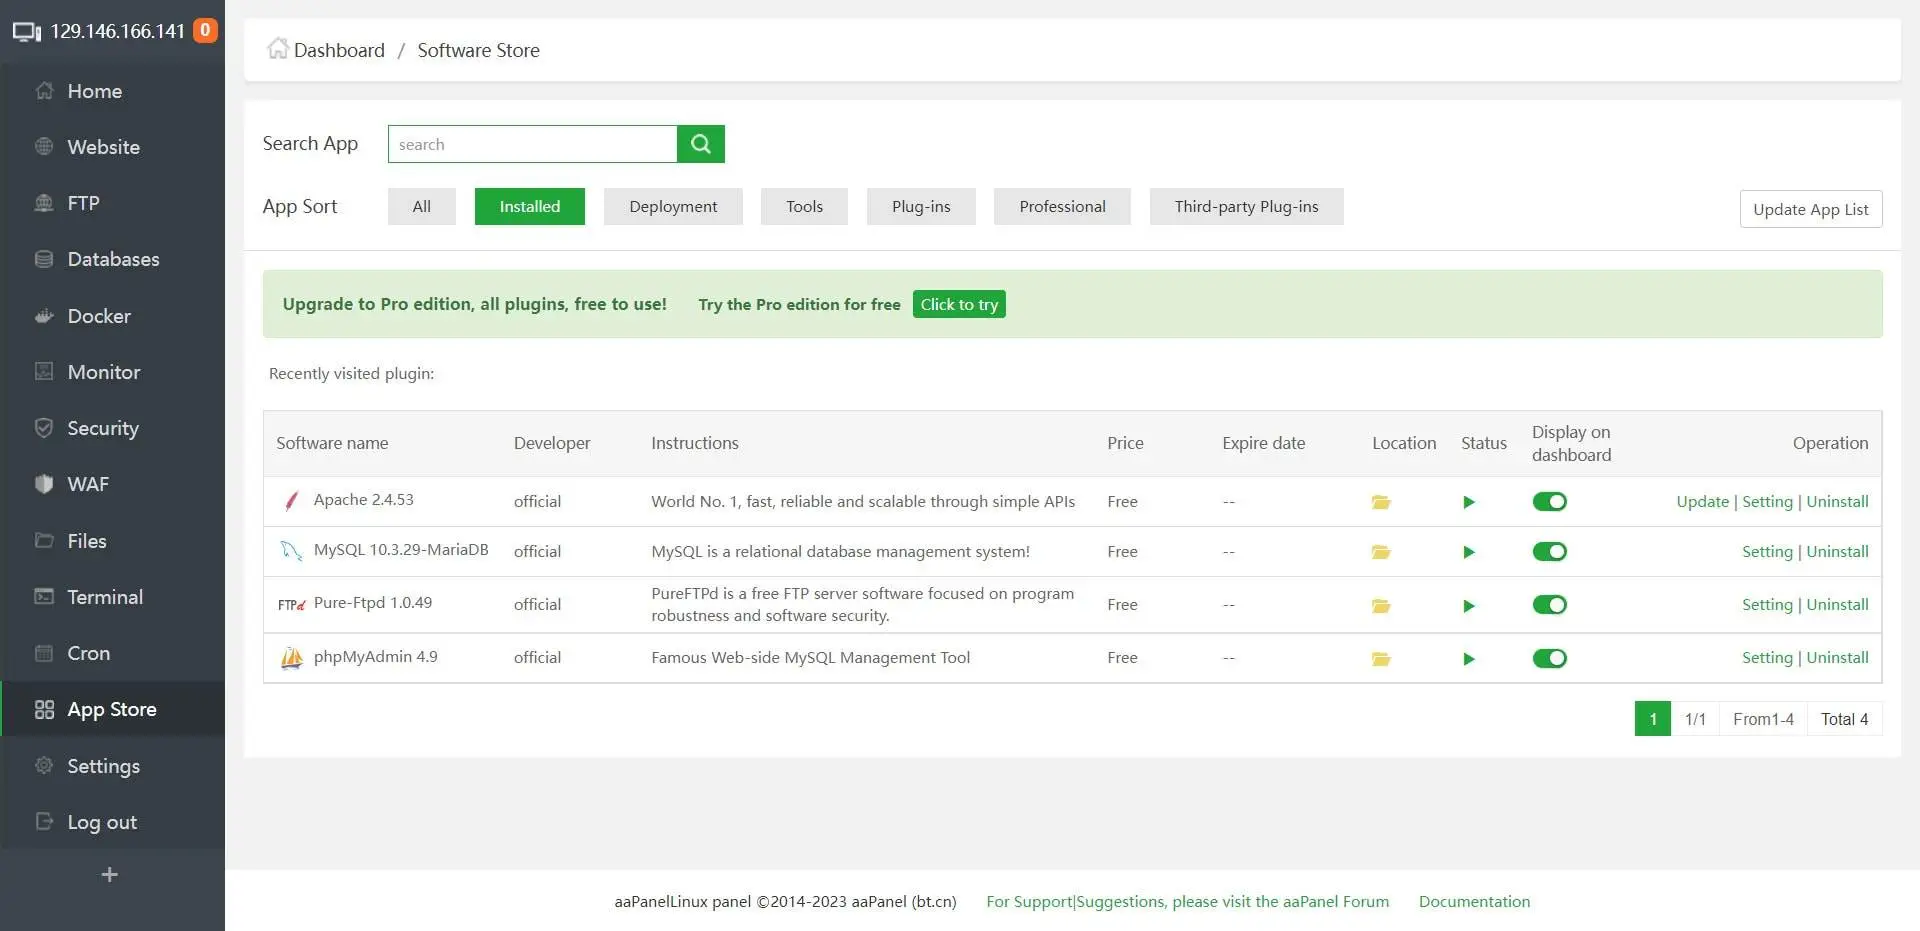 Step 14: make sure the new software installed correctly by clicking the
 App Store link from the main menu, then click Installed in the App Sort filters.
Step 15: the last step is to maximize security by adding a Let's Encrypt SSL certificate to panel but, before we do, we need to decide on a subdomain then add an A record for it to your domain's DNS. It's at this moment I need to mention there's almost an infinite number of ways your DNS could be set up and, hopefully, you understand how to add entries to it. Most folks probably use their domain registrar's DNS system so you could try adding their name to the back of this Google query. Once you've figured out how to add an A record for the subdomain your can check its real-time propagation using What's My DNS.
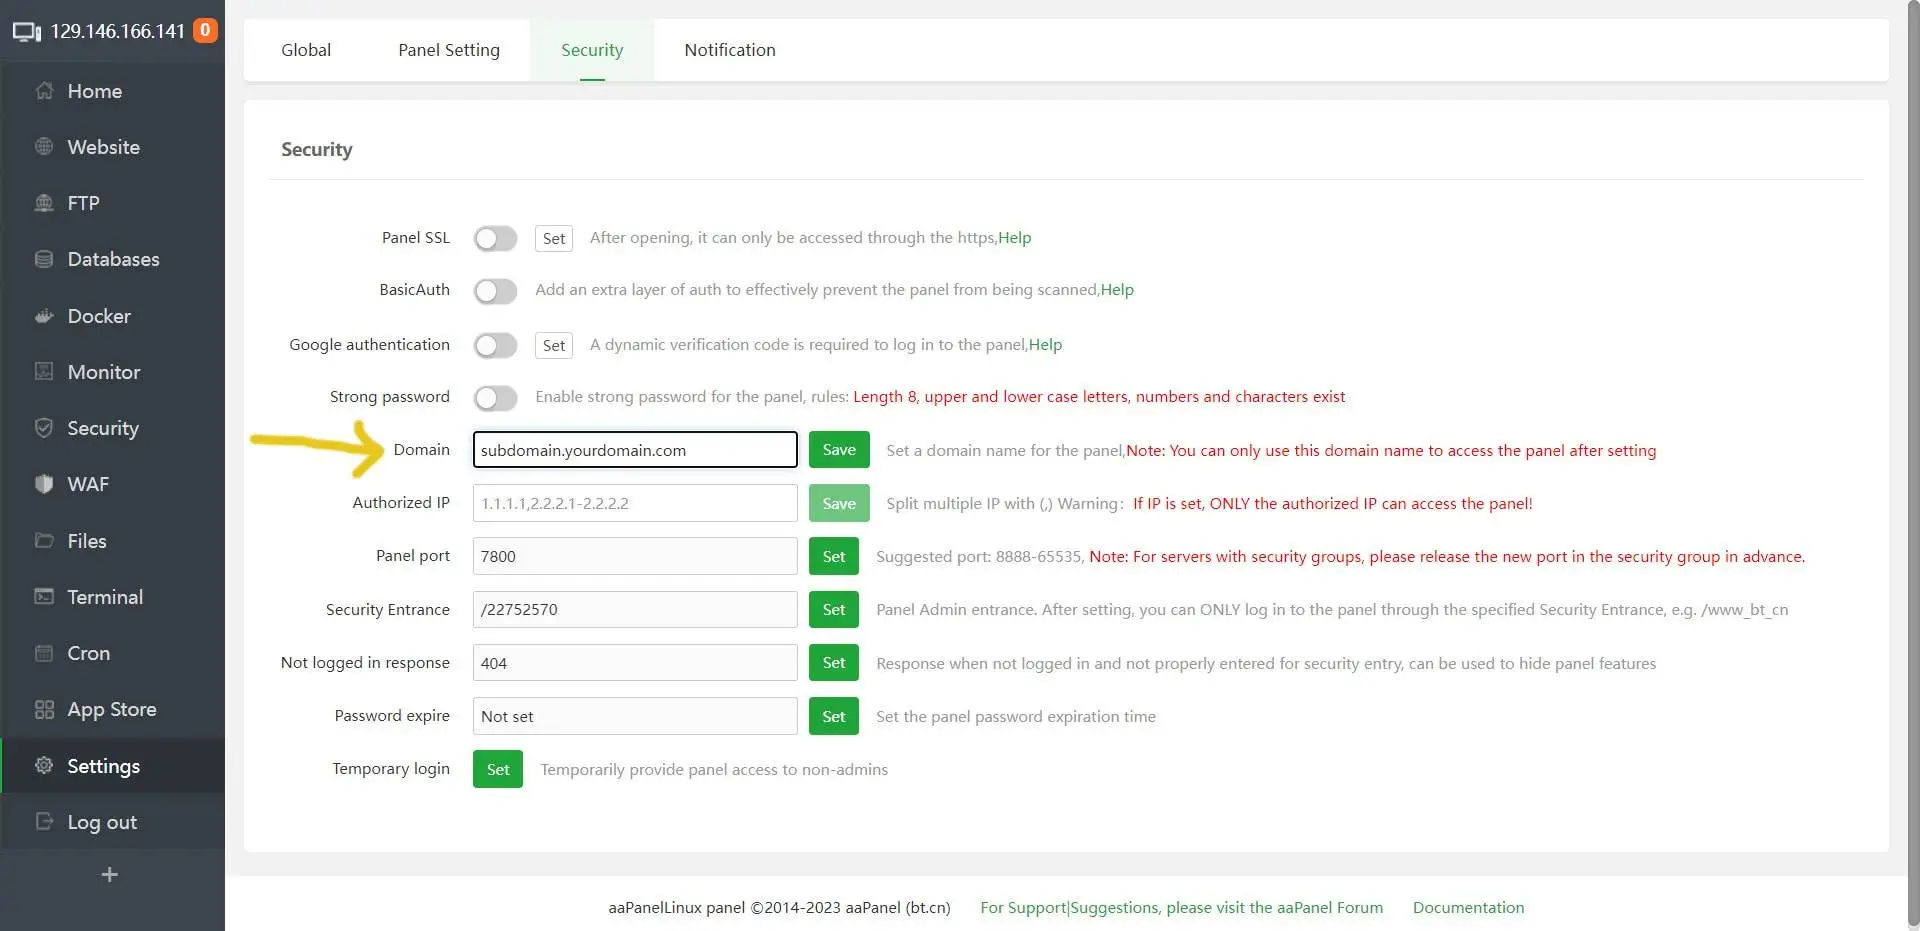 Step 16: with the subdomain fully propagated, navigate to the
 Settings area from aaPanel's main menu then click the Security tab. Type the URL of the subdomain in the Domain field then click the Save button. After Save is clicked the aaPanel will immediately redirect to the subdomain so you need to make sure it fully propagated and you can reach it through your ISP. If not, copy and paste rm -f /www/server/panel/data/domain.conf into your SSH terminal and hit enter.
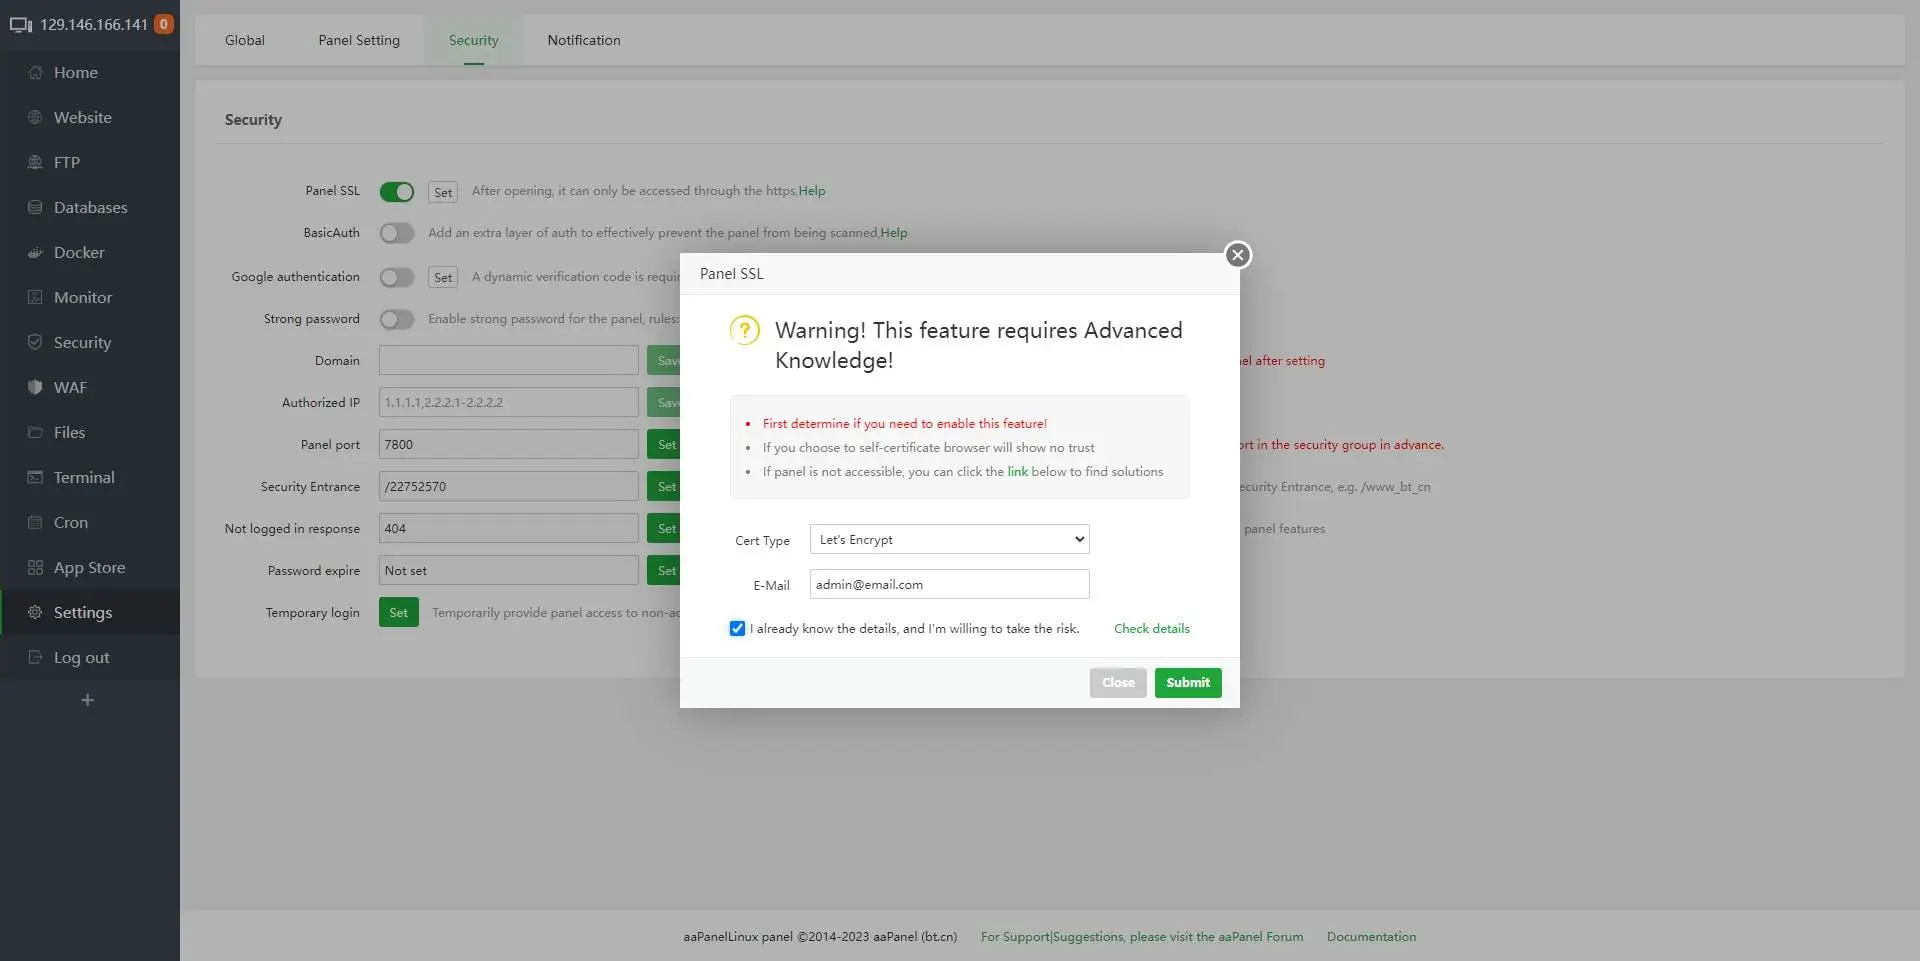 Step 17: with aaPanel connected to a subdomain it's time to add the Let's Encrypt SSL certificate. Make sure you're in the
 Settings area and the Security tab, then click the Panel SSL toggle and a dialogue box will appear. In the Cert type dropdown box select Let's Encrypt, add an email address to the E-Mail field, tick the box next to the text "I already know the details, and I'm willing to take the risk", then click the Submit button.
And that's it! You've officially installed aaPanel with a stack of software, added a subdomain, and installed a Let's Encrypt SSL certificate. Now it's time to add a user, domain, database, and spin up a WordPress site on your shiny new control panel an a always free Oracle Cloud instance. 🎉
Control Panel #2: Hestia 1 - 2 hours
! Helpful resources:
1. installation instructions
2. Getting started page
3. Installation script switches builder
Step 1: before we step into the Hestia control panel installation the first thing is to decide on a subdomain then add an A record for it to your domain's DNS. It's at this moment I need to mention there's almost an infinite number of ways your DNS could be set up and, hopefully, you understand how to add entries to it. Most folks probably use their domain registrar's DNS system so you could try adding their name to the back of this Google query. Once you've figured out how to add an A record for the subdomain your can check its real-time propagation using What's My DNS.
Step 2: once the subdomain fully propagated it's time to install Hestia. If you're not already, please make sure to connect to your Oracle Cloud instance via SSH and log in as a root user by typing sudo -s then hit enter.
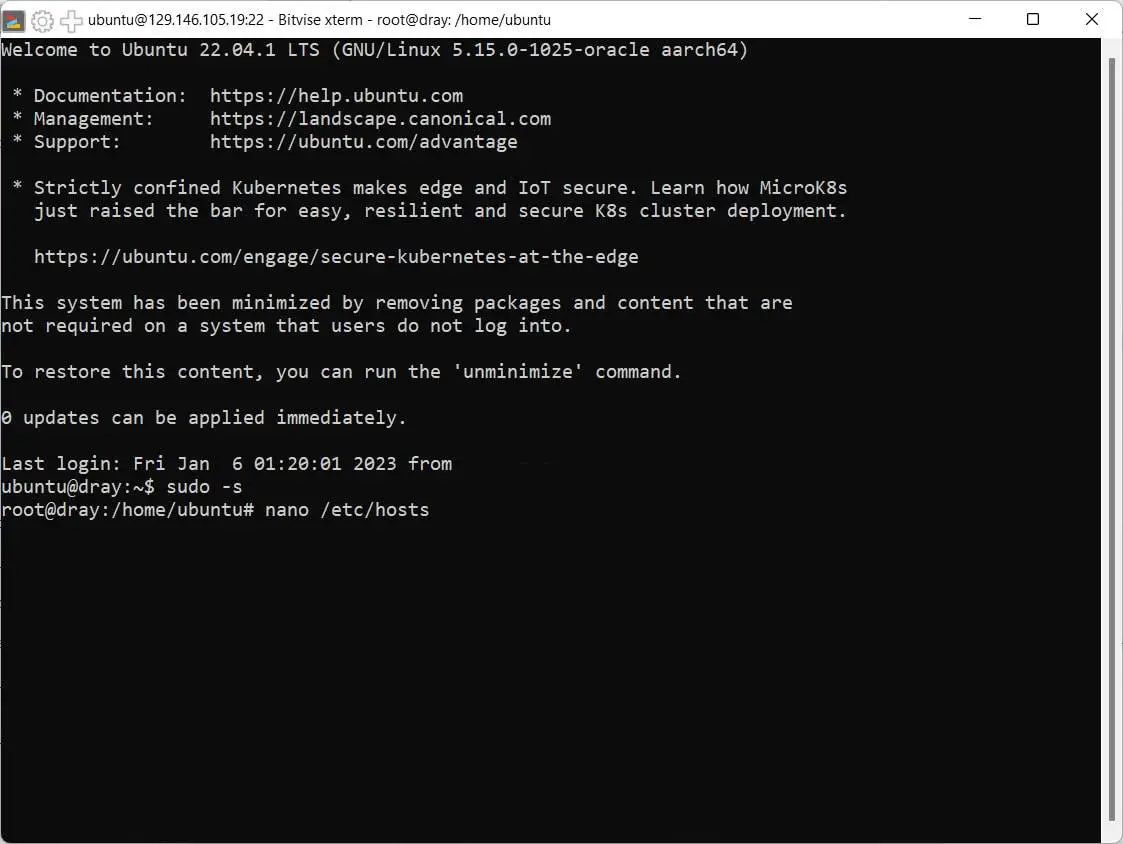 Step 3: add your newly-propagated subdomain to Ubuntu by editing the hosts file. To do so copy and paste
 nano /etc/hosts into the SSH terminal and hit enter.
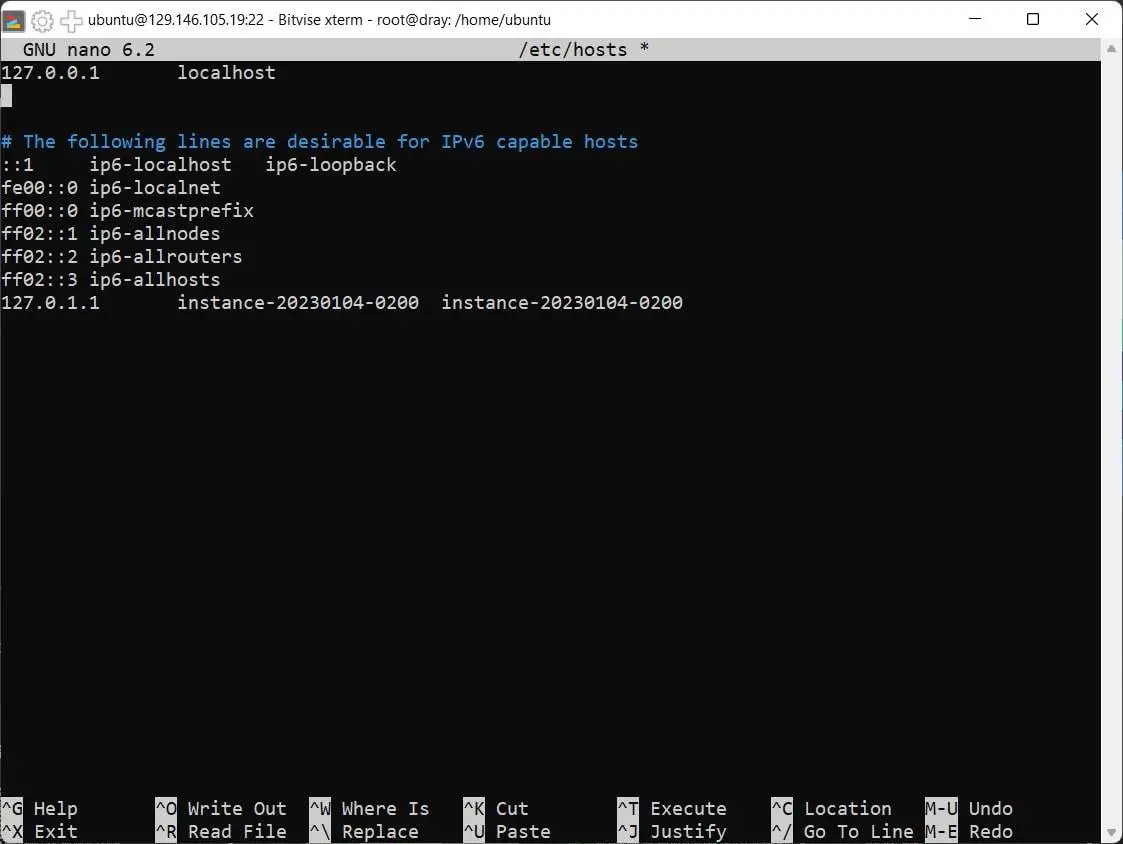 Step 4: use the arrow keys to navigate to the empty line below 127.0.0.1 localhost and hit
 enter to add a line.
 Step 5: hit the up arrow once so you're on the line under 127.0.0.1 localhost then type
 127.0.0.1 hit space (or tab if you prefer) then type in the subdomain added during the Step 1 of this section.
Step 6: if everything looks right hit Ctrl + X on your keyboard to Save the modified buffer then Y to accept the changes, and enter to save the file to /etc/hosts.
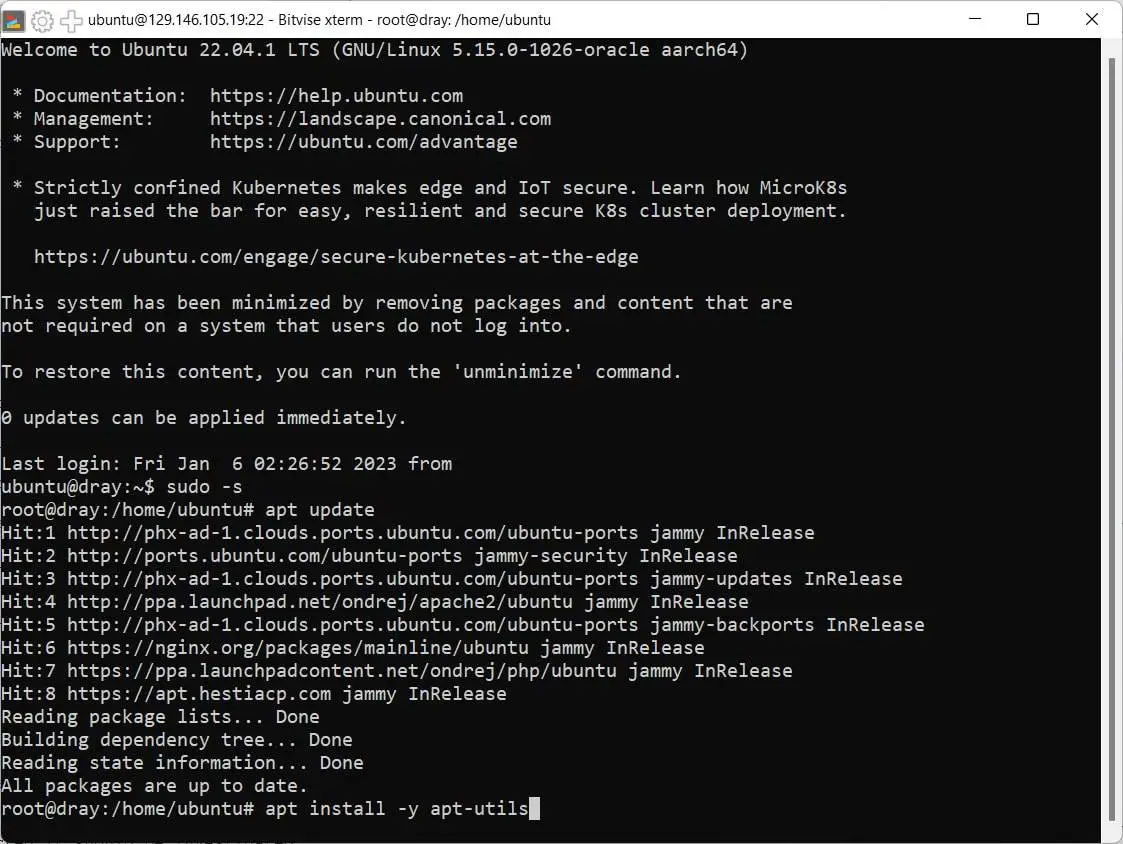 Step 7: now install Ubuntu updates by typing
 apt update then hit enter. When the update process is complete we need to install apt-utils. Please copy and paste apt install -y apt-utils into your SSH terminal then hit enter.
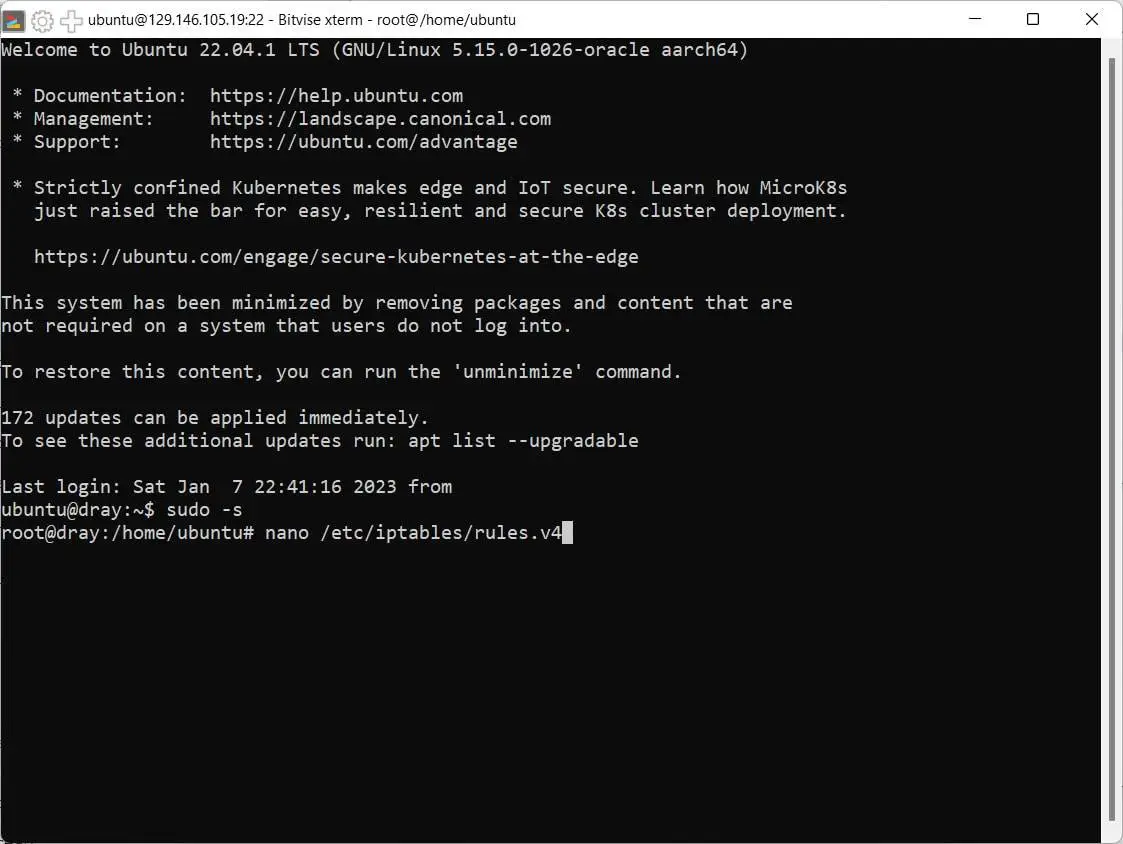 Step 8: with apt-utils installed we should open a port for Hestia in iptables. It will use port 8083 by default. Please copy and paste
 nano /etc/iptables/rules.v4 into the SSH terminal and hit enter.
 Step 9: look for a line which reads
 -A INPUT -p tcp -m state --state NEW,ESTABLISHED -m multiport --dports 22,53,80,443,8083 -j ACCEPT and use the arrow keys on your keyboard to move the cursor to the end of the port list 22,53,80,443.
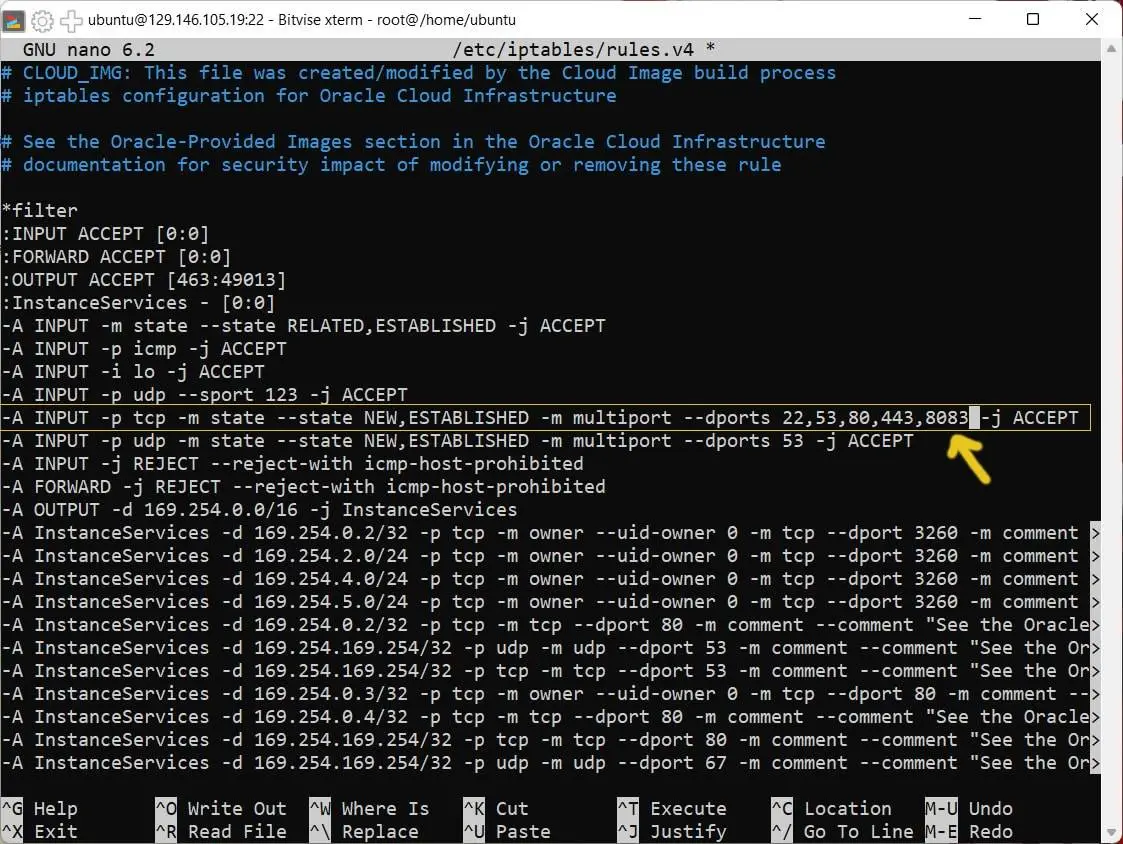 Step 10: with the cursor behind the port list type
 comma then 8083 so the entire line reads -A INPUT -p tcp -m state --state NEW,ESTABLISHED -m multiport --dports 22,53,80,443,8083 -j ACCEPT.
Step 11: if everything looks right hit Ctrl + X on your keyboard to Save the modified buffer then Y to accept the changes, and enter to save the file to /etc/iptables/rules.v4.
Step 12: be sure to login to the Oracle Cloud dashboard and add ingress rules for port 8083 to the Security list details page as we covered in Steps 3 - 4 of the Let's tune the Oracle Cloud firewall section.
Step 13: with the prep work complete it's time to install Hestia. Let's kick things off from the /tmp directory. Please type cd /tmp then hit the enter key to navigate there.
Step 14: now that we're in the /tmp directory we need to download the control panel installation script, detailed in Hestia's installation instructions. To do so please copy and paste wget https://raw.githubusercontent.com/hestiacp/hestiacp/release/install/hst-install.sh into your SSH terminal then hit enter.
Step 15: okay, decision time. You can either follow Hestia's installation instructions on the homepage of their site, customize the installation by combing through this list of command-line switches or, what I do, use the Hestia Scriptline Generator to build your installation string for you. If you decide to use command-line switches to customize the installation, I discovered that I needed to add --force to the end to get it to install correctly.
Step 16: in the end my installation string looked like this:
bash hst-install.sh --apache yes --phpfpm yes --multiphp yes --vsftpd no --proftpd no --yes yes --mysql yes --postgresql no --exim yes --dovecot yes --sieve no --clamav yes --spamassassin yes --iptables no --fail2ban yes --quota yes --api yes --interactive yes --with-debs no --port '8083' --hostname 'subdomain.yourdomain.com' --email 'none@none.com' --password 'ThisIsMySuperSecurePassword' --lang 'en' --force
then I hit the enter key to begin the installation.
![the installation will mention it's installing dependencies then drop into a Hestia Control Panel splash screen and ask Would you like to continue with the installation? [Y/N], hit the enter key to continue, the installation will take about 20 minutes](https://anseltaftcom78453.zapwp.com/q:i/r:0/wp:1/w:1/u:https://anseltaft.com/wp-content/uploads/2023/01/install-hestia-control-panel-08.jpg) Step 17: the installation will mention it's installing dependencies then drop into a Hestia Control Panel splash screen and ask
Step 17: the installation will mention it's installing dependencies then drop into a Hestia Control Panel splash screen and ask Would you like to continue with the installation? [Y/N]. Hit the enter key to continue. The installation will take about 20 minutes if you opt for most items in the customization list, such as multiple versions of PHP.
Step 18: if the installation completed successfully you should see a message at the end:
Congratulations!
You have successfully installed Hestia Control Panel on your server.
Ready to get started? Log in using the following credentials:
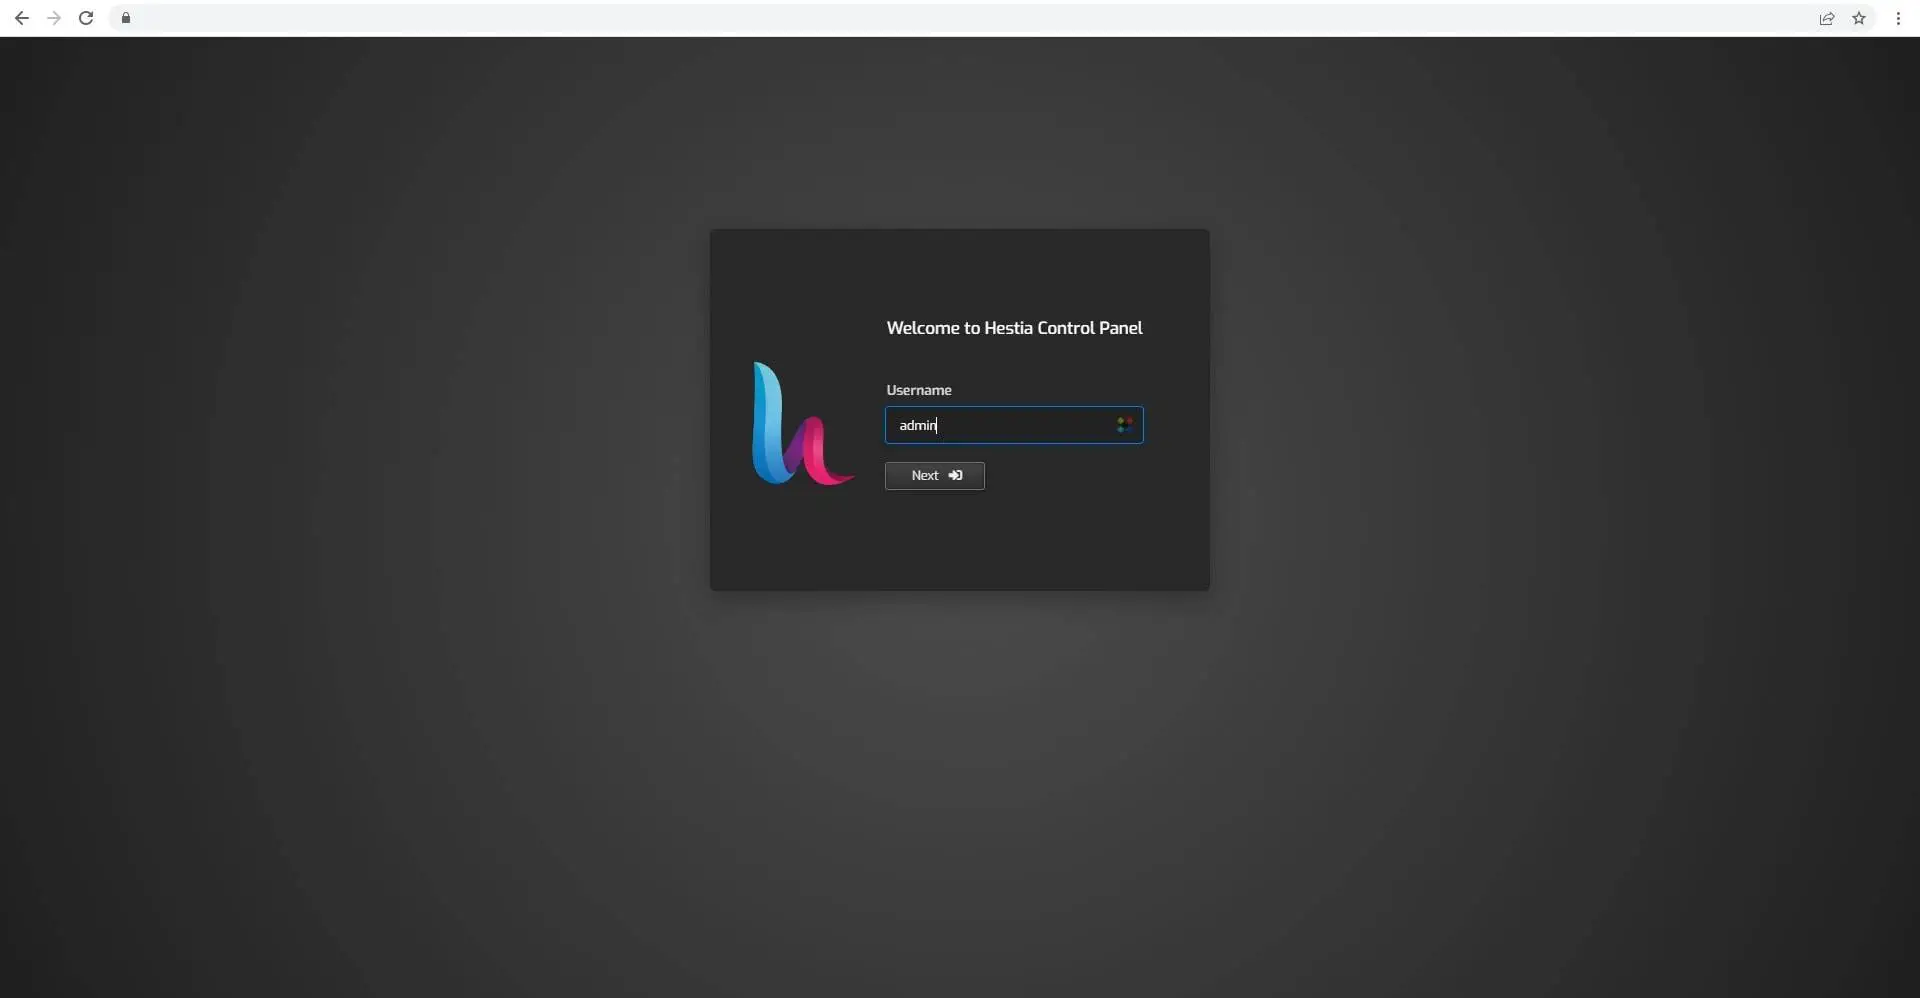
Admin URL: https://xxx.xxx.xxx.xxx:8083
Username: admin
Password: The password you chose during installation.
Thank you for choosing Hestia Control Panel to power your full stack web server, we hope that you enjoy using it as much as we do!
Please feel free to contact us at any time if you have any questions, or if you encounter any bugs or problems:
Documentation: https://docs.hestiacp.com/
Forum: https://forum.hestiacp.com/
Discord: https://discord.gg/nXRUZch
GitHub: https://www.github.com/hestiacp/hestiacp
Note: Automatic updates are enabled by default. If you would like to disable them, please log in and navigate to Server > Updates to turn them off.
Help support the Hestia Control Panel project by donating via PayPal: https://www.hestiacp.com/donate
--
Sincerely yours,
The Hestia Control Panel development team
Made with love & pride by the open-source community around the world.
[ ! ] IMPORTANT: The system will now reboot to complete the installation process.
Press any key to continue
Step 19: Please follow directions and hit any key on your keyboard to reboot the Oracle Cloud instance. It will take about 20 seconds to reboot. After which please try to reconnect via SSH then type sudo -s then enter to log back in as a root user.
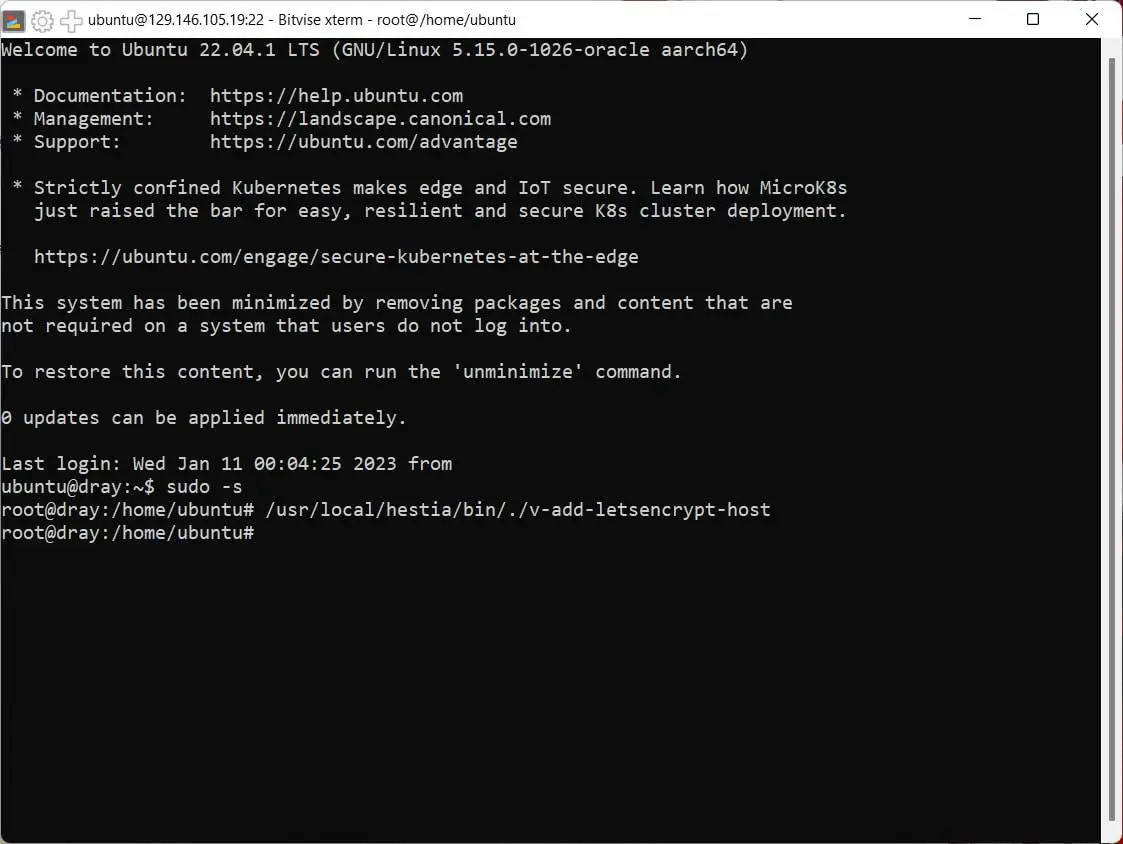 Step 20: we're just about ready to log in to the control panel, but first we need to switch the SSL certificate from a self-hosted certificate to a Let's Encrypt certificate. To do so, please copy and paste
 /usr/local/hestia/bin/./v-add-letsencrypt-host into your SSH terminal and hit enter. If you were successful setting up your subdomain as the hostname back in steps 1-6 then the command will execute without issue.
 Step 21: we're finally at the end of the Hestia installation and, if every upstream task was successfully completed, the control panel should pop right up in a web browser if we feed it the correct URL. To that end please ignore the address the Hestia installation spit out in the successful installation message and switch the IP address to your subdomain like this:
 https://subdomain.yourdomain.com:8083/.
And that's it! You've officially installed Hestia control panel with a stack of software, tied it to a subdomain, and installed a Let's Encrypt SSL certificate. Now it's time to add a user, domain, database, and spin up a WordPress site on your shiny new control panel an a always free Oracle Cloud instance. 🎉
You can have a test with Cloudpanel, it is a good option for arm based cloud.
It does look good!